In this tutorial, we will discuss Cisco ASA Firewall Security Levels and Zones in detail. By default, during the initial deployment of the Cisco ASA firewall in Layer 3 or Routing Mode, we have to configure the security zones on each logical interface. Further, We need to assign the Security Level to each logical interface that controls the traffic flow. Let’s have a good understanding of Security Levels and Zones.
Understanding Interfaces and Security Levels in Cisco ASA Firewall
Before understanding the Security Levels, let’s discuss the Interfaces and Security Zones in the Cisco ASA Firewall. In Routing or Layer 3 mode deployment, we define an IP Address, Security Level, and nameif (Zone) on each interface.
A single logical interface has only one security zone and Security Level. So, multiple interfaces can have different security levels and different zones.
We can easily control the traffic in different security zones using ACL (Access Control Lists).
Now, let’s understand the Security Level!
Security Levels in Cisco ASA Firewall
The Security Level is nothing but a number between 0 and 100. A High-Security level means we have higher trust, and Low-Security level means Lower trust in a particular network.
First, look at the image below to understand the security levels.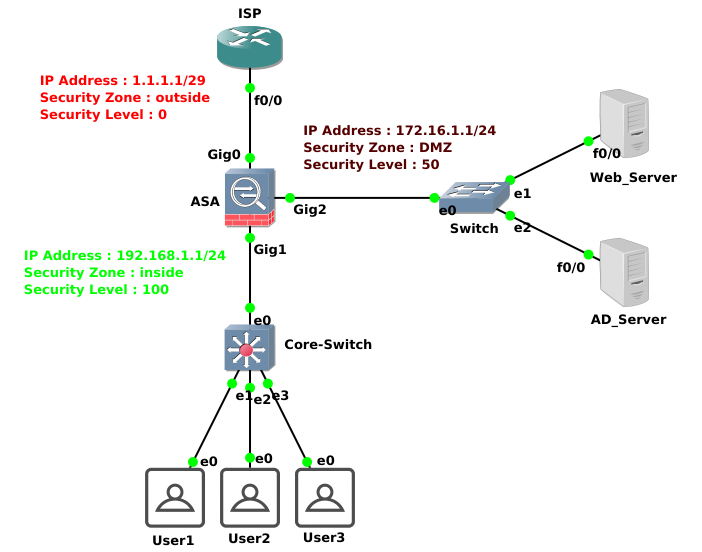
The Cisco ASA Firewall has three different interfaces. Interface Gig0/0 is configured with IP Address 1.1.1.1/29 and connected with ISP. It has an outside security zone with a 0 security level.
Interface Gig0/1 is configured with IP address 192.168.1.1/24 and connected with the internal Core. It has an inside security zone with a 100 security level.
Interface Gig0/2 is configured with IP address 172.16.1.1/24 and connected with the DMZ Network. It has a DMZ security zone with a 50 security level.
All traffic from the Highest Security Level to the Lowest Security Level is allowed. So, usually, we define the highest security level to the LAN or Inside interface, i.e., 100, and the lowest security level to the Outside or Internet interface, i.e., 0.
Similarly, traffic from the Low-Security Level to the High-Security Level is denied by default. We need to configure an ACL to allow that particular traffic.
To have a better understanding of the security levels, let’s discuss a few examples:
1. Cisco ASA: Security Level 100
- This is the highest security level assigned to the most Trusted Interface/Zone. Usually, we assign the Highest Security Level to the LAN / Corporate Interface.
- Traffic from a High-Security level to a Low-Security level is allowed by default.
By default, inside security zone has a security level of 100. But, it is always 0 in different security zones names, i.e. outside, dmz.
2. Cisco ASA: Security Level 0
- This is the Lowest Security Level assigned to the most untrusted Interface/Zone. We usually assign the Lowest Security level to the ISP or Internet Interface.
- Traffic from the Low-Security Level to the High-Security Level is denied by default.
Accordingly we need to configure Access Control Lists (ACLs) to allow this traffic from Outside to Inside or DMZ.
3. Cisco ASA: Security Levels between 1 – 99
- Security Levels between 1 – 99 can be assigned to different zones, such as DMZ.
- The traffic from the High-security level, i.e., inside (100), to the Low-Security level, i.e., DMZ (50), is allowed by default.
- The traffic from the Low-Security level, i.e., outside (0), to the High-Security level, i.e., DMZ (50), is denied by default.
Default Traffic Behaviour in Cisco ASA
We have discussed the security levels and security zones in detail. Now, understand the default traffic behavior in detail.
- Traffic from the inside zone to the outside & DMZ is allowed by default.
- Traffic from outside zone to inside and DMZ is denied by default.
- Similarly, Traffic from the DMZ to the inside zone is denied by default. Therefore, we need to implement ACLs to allow it.
- Traffic from the DMZ to the outside zone is allowed by default.
Security Levels and Zones (nameif) configuration on Cisco ASA Firewall
Finally, I’ll configure the security levels and zones on the Cisco ASA Firewall. We can do the same via ASDM and CLI. In this example, we will configure the security levels via CLI. Let’s start!
The Outside Interface:
ASA#configure terminal
ASA(config)# interface gigabitethernet0/0
ASA(config-if)# nameif outside
ASA(config-if)# ip address 1.1.1.1 255.255.255.248
ASA(config-if)# security-level 0
ASA(config-if)# no shutdown
The Inside Interface:
ASA#configure terminal
ASA(config)# interface gigabitethernet0/1
ASA(config-if)# nameif inside
ASA(config-if)# ip address 192.168.1.1 255.255.255.0
ASA(config-if)# security-level 100
ASA(config-if)# no shutdown
The DMZ Interface:
ASA#configure terminal
ASA(config)# interface gigabitethernet0/2
ASA(config-if)# nameif DMZ
ASA(config-if)# ip address 172.16.1.1 255.255.255.0
ASA(config-if)# security-level 50
ASA(config-if)# no shutdown
Related Articles
- Cisco ASA Firewall – Hairpin or U-turn NAT
- Configure Cisco ASA Firewall for ASDM Access
- Enable Telnet and SSH access to the Cisco ASA Firewall
- How to configure Static Routes on Cisco ASA Firewall
- How to configure High Availability in Palo Alto Networks Firewall
- Install Apache Web Server on Ubuntu 22.04
- Configure SNMPv3 on CentOS
- How to install Apache Web Server on CentOS 7
- pfSense Firewall Quick Overview | Getting Started with pfSense
Summary
Cisco ASA Firewall Security Zones and Security Levels in detail. Security Zone must be configured during the initial deployment in Layer 3 mode. It helps to secure our internal assets (Users, Servers) using ACLs. We discussed that the Security Level is a number between 0 and 100. By default, traffic from the High-Security level to the Low-Security level is allowed. However, the traffic from the Low-Security level to the High-Security level is denied by default. Therefore, we must configure Access Control Lists (ACLs) to allow that traffic. Finally, we configured security zones and security levels on each interface.
Hope you have enjoined this article. In case you like this article, please share it on different platforms. Also, please comment in the comment box for any suggestions.