In this article, we will discuss and configure static routing on the Cisco ASA Firewall in detail. Cisco ASA supports both static and dynamic routing protocols such as RIP, OSPF, EIGRP, and BGP. You can configure static routing using the ASDM or command-line interface. We will cover both ways to configure static routes on Cisco ASA. So, Let’s start!
Cisco ASA: Understanding the topology for Static Routing Configuration
Before starting the static routing configuration, let’s first understand the topology so you will configure the static routes more efficiently. Let’s understand the below image:
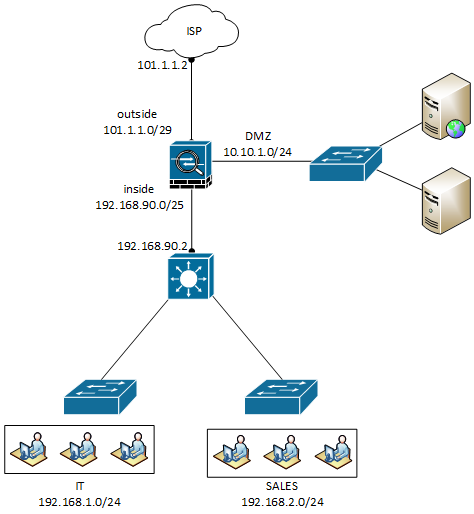
We have configured three interfaces, namely, Outside, Inside, and DMZ, on the Cisco ASA Firewall. The Outside Interface is connected to the ISP. Some of the web servers are hosted in the DMZ. The inside interface is connected to the Internal Core. Further, we have two different networks configured on the internal Core.
In this topology, we need to configure a static default route towards the ISP. Since we have two networks connected with the internal core switch, we also need to configure both routes towards the internal Core.
Configuring Static Route on Cisco ASA Firewall
To configure static routes, we must have the required privileges. Below is an example of configuring static routes on the ASA Firewall.
route <interface> <destination> <netmask> <next-hop>
We need to change the values like interface, destination address, netmask, and next-hop. The interface will be the nameif/zone you have assigned to that particular interface. Then, we need to specify the destination address with the netmask. Finally, you have to configure the next-hop IP address.
So, the default route configuration example will be:
ciscoasa(config)#route outside 0.0.0.0 0.0.0.0 101.1.1.2
Similarly, we can configure inside routes towards our internal Core switch. Here, we need to configure two routes, 192.168.1.0/24 and 192.168.2.0/24, and the gateway will be the internal Core switch.
ciscoasa(config)#route inside 192.168.1.0 255.255.255.0 192.168.90.2
ciscoasa(config)#route inside 192.168.2.0 255.255.255.0 192.168.90.2
In this way, we have successfully configured all three static routes on the Cisco ASA Firewall. You can check all these routes using the below show command:
ciscoasa# show route static

Codes: L - local, C - connected, S - static, R - RIP, M - mobile, B - BGP
D - EIGRP, EX - EIGRP external, O - OSPF, IA - OSPF inter area
N1 - OSPF NSSA external type 1, N2 - OSPF NSSA external type 2
E1 - OSPF external type 1, E2 - OSPF external type 2
i - IS-IS, su - IS-IS summary, L1 - IS-IS level-1, L2 - IS-IS level-2
ia - IS-IS inter area, * - candidate default, U - per-user static route
o - ODR, P - periodic downloaded static route, + - replicated route
Gateway of last resort is 101.1.1.2 to network 0.0.0.0

S* 0.0.0.0 0.0.0.0 [1/0] via 101.1.1.2, outside
S 192.168.1.0 255.255.255.0 [1/0] via 192.168.90.2, inside
S 192.168.2.0 255.255.255.0 [1/0] via 192.168.90.2, inside
All the highlighted entries are the static routes we have configured on the Cisco ASA Firewall.
Configure Static Routes on Cisco ASA Firewall using ASDM
In this session, we will configure the static routes using Cisco ASDM. Before starting, ensure you can access the Cisco ASA Firewall using ASDM.
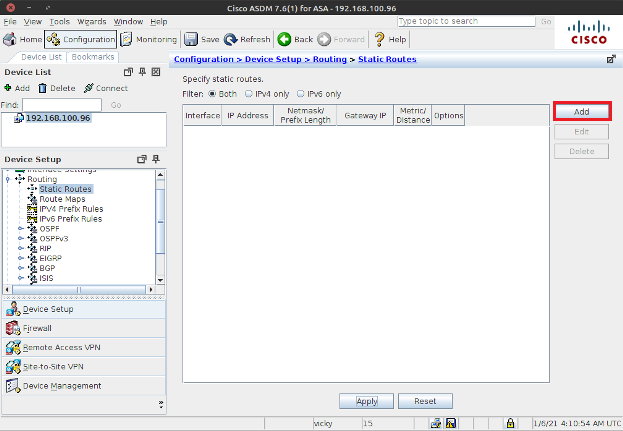
Well, now, let’s access the Cisco ASA using the ASDM application. Navigate to Configuration> Device Setup > Routing > Static Routes and click Add.
Once you click on the Add button, a popup window will appear. In this window, you need to select the interface and define the destination address with netmask and gateway. You can refer to the image below.
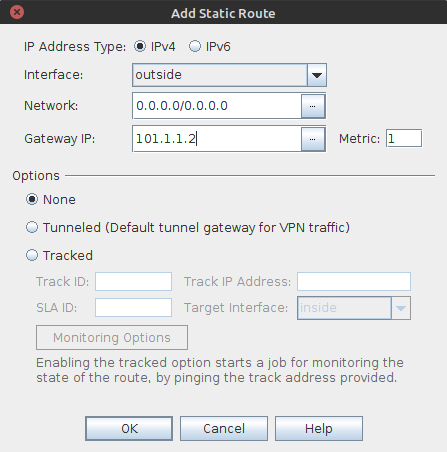
The matric is 1 for static routes by default. However, you can change it to meet your requirements. I’ve configured the destination address without any address objects. It would be a great idea to have address objects configured on the ASA Firewall.
Similarly, you can configure different static routes pointing to the Internal Core. Once you finish the Configuration, you must apply the changes to be effective on the Cisco ASA appliance.
Related Articles
- Cisco ASA Firewall – Hairpin or U-turn NAT
- Cisco ASA: Security Levels and Zones Explained
- Configure Cisco ASA Firewall for ASDM Access
- Enable Telnet and SSH access to the Cisco ASA Firewall
Reference
Summary
Routing is essential for all firewalls in routing mode. Cisco ASA supports both static and dynamic routing. In this article, we have configured static routes using CLI and ASDM. Both ways are straightforward and helpful to configure static routes. Finally, we have checked static routes on the Cisco Firewall using CLI.
Hope you like this article. If you like this article, just share it on social media platforms. Also, in case if you have some issues during the configuration, don’t hesitate to comment in the comment box!
thanks for this it’s very helpful.
would you mind helping me to configure my asav to different subnets and anyconnect for remote users. I have deployed to Azure. not sure how to configure routing gateway. Any help would be much appreciated
thanks
Hello Taylor1, maybe you can follow this guide: https://www.firewallbuddy.com/cisco-asa-anyconnect-ssl-vpn/. If any issue persists, please contact us.
Thank you.