Hairpin NAT, or U-Turn NAT, is helpful in different ways. Usually, using Hairpining, internal resources are accessed using its public IP Address. Hairpin NAT is also known as U-Turn NAT. This tutorial will configure Hairpin NAT in the Cisco ASA Firewall. Let’s get started!
What is Hairpin NAT?
In hairpin NAT, the traffic enters and exits on the same interface. Generally, when we enable the SSL VPN and want internet access through the Firewall, the SSL VPN traffic hits the Internet-facing interface, and Internet traffic uses the same interface to reach the Internet.
Accessing the internal resources using its public IP Address is also an example of Hairpin NAT. Firewalls perform Source and Destination network address translation at the same time. Therefore, the resource consumption will be high.
Usually, vendors don’t recommend configuring Hairpin NAT.
In this article, we will configure Hairping NAT for a web server placed in LAN and DMZs.
Hairpin NAT on Cisco ASA for a web server placed in DMZ
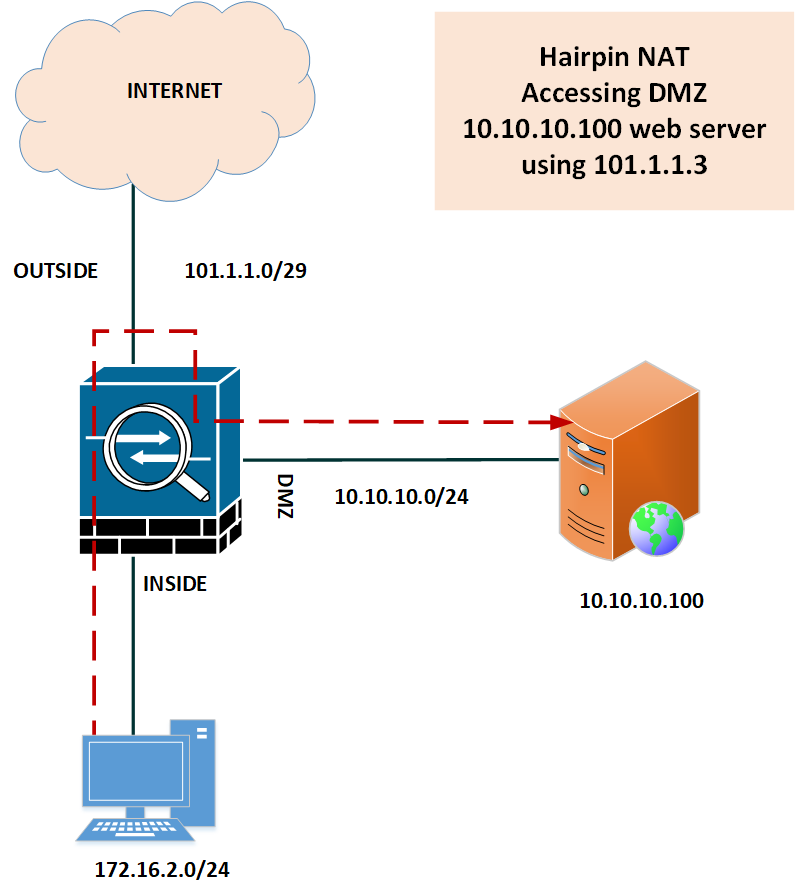
In this section, we will configure Hairpin NAT for a web server placed in DMZ. We will access this web server using its public IP Address. Here, the Inside PC with IP Address 172.16.2.10 will access DMZ Web Server 10.10.10.100 with its public IP Address, i.e., 101.1.1.3.
Let’s start our configuration by configuring the address objects:
object network obj-101.1.1.3
host 101.1.1.3
!
object network obj-10.10.10.100
host 10.10.10.100
!
object network obj-172.16.2.10
host 172.16.2.10
Now, we will configure a Hairpin NAT rule to access the DMZ web server using its public IP Address:
nat (inside,dmz) source static obj-172.16.2.10 interface destination static obj-101.1.1.3 obj-10.10.10.100
Let’s understand the NAT rule. We are performing natting from inside to dmz. The real source is our INSIDE PC, i.e., 172.16.2.10, and to perform the source NAT, we added a DMZ interface with the interface command. Further, we mapped the real destination, i.e., IP 10.10.10.100, with public IP 101.1.1.3.
Since we used the DMZ interface for the address translation, you will get the below warning after creating the NAT rule:
WARNING: All traffic destined to the IP address of the dmz interface is being redirected.
WARNING: Users may not be able to access any service enabled on the dmz interface.
Since the traffic is initiated from inside, we must create an access list to allow this traffic. You can hit the below command to create an ACL to allow this traffic:
access-list inside_in extended permit ip object obj-172.16.2.10 object obj-10.10.10.100 log informational
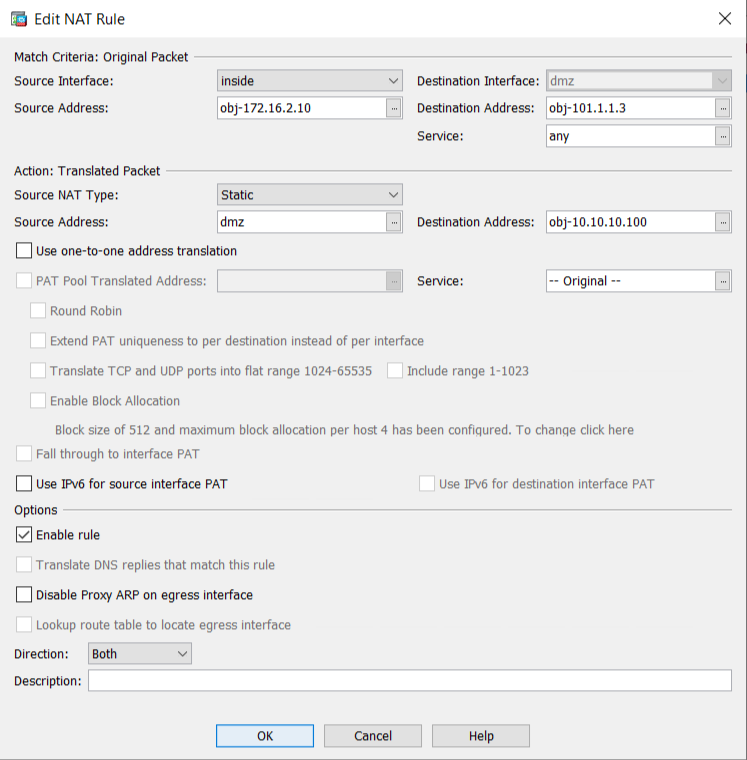
If you are using ASDM, you can refer to the below screenshot for NAT configuration.
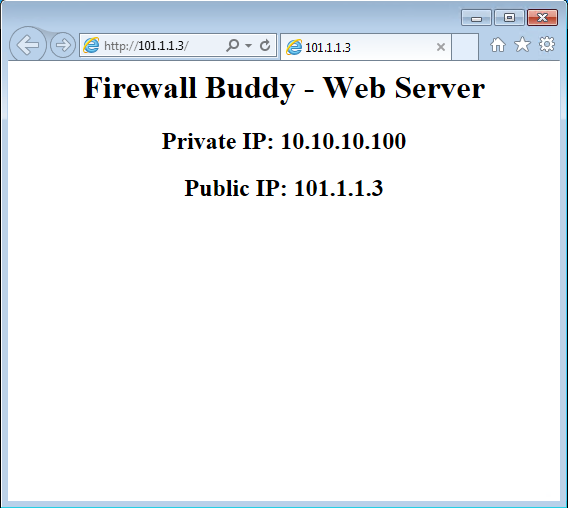
Now, we can access the DMZ web server using a Public IP Address, i.e., 101.1.1.3.
Additionally, you can verify the results using the show nat detail command.
ciscoasa# show nat detail
Manual NAT Policies (Section 1)
1 (inside) to (dmz) source static obj-172.16.2.10 interface destination static obj-101.1.1.3 obj-10.10.10.100
translate_hits = 2, untranslate_hits = 2
Source - Origin: 172.16.2.10/32, Translated: 10.10.10.1/24
Destination - Origin: 101.1.1.3/32, Translated: 10.10.10.100/32
Hairpin NAT on Cisco ASA for a web server placed Inside
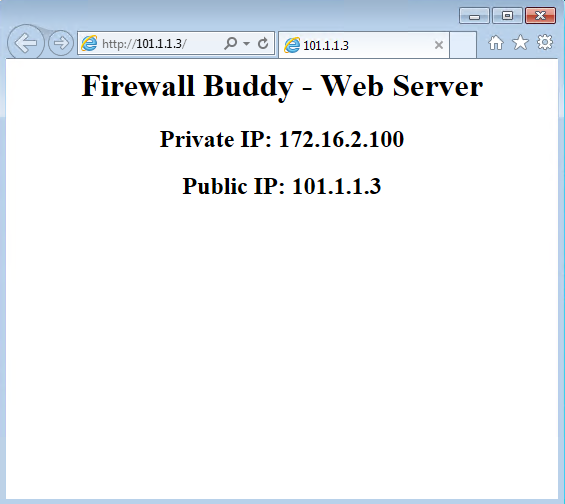
In this example, we will perform Hairpin NAT to access an inside Web Server, 172.16.2.100, from an Inside PC, 172.16.2.10 using its public IP Address, 101.1.1.3.
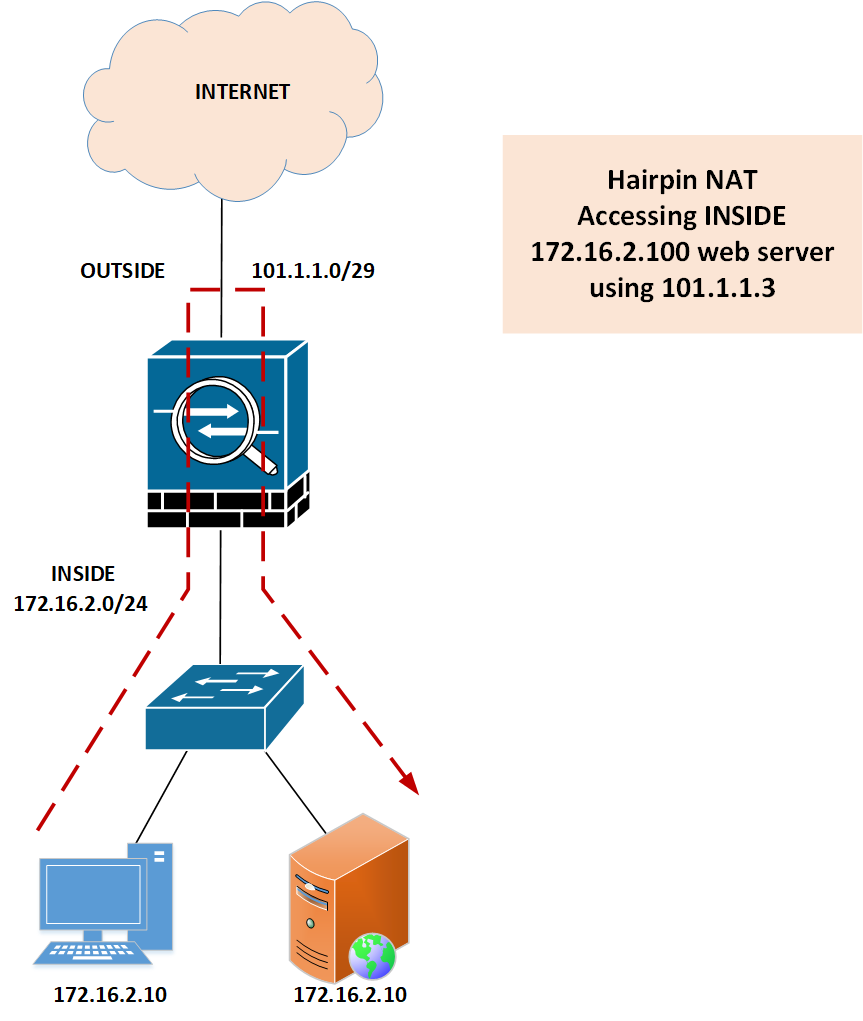
Since the real source and destination are behind the Inside interface, we must allow the traffic that is coming and going out from the same interface. You can configure the below command to permit the incoming and outgoing traffic from the same interface:
same-security-traffic permit intra-interface
Now, let’s start with the object configuration.
object network obj-101.1.1.3
host 101.1.1.3
!
object network obj-172.16.2.100
host 172.16.2.100
!
object network obj-172.16.2.10
host 172.16.2.10
Now, we will configure a Hairpin NAT rule to access the Inside web server using its public IP Address:
nat (inside,inside) source static object network obj-172.16.2.10 interface destination static obj-101.1.1.3 obj-172.16.2.100
As you can see, we took both source and destination interfaces inside. 172.16.2.10 is our real source, and we performed the source NAT using the inside interface. Using destination NAT, we translated 101.1.1.3 to 172.16.2.100.
Now, we can access the Inside web server using a Public IP Address, i.e., 101.1.1.3.
From ASDM, the NAT rule will look like the below screenshot:

Further Reading
- Cisco ASA: Security Levels and Zones Explained
- Configure Cisco ASA Firewalls for ASDM Access
- How to configure Static Routes on Cisco ASA Firewall
- Cisco ASA Configuration Backup using SCP, TFTP, and ASDM
Conclusion
Hairpin nat performs the source and destination nat on a single package. Usually, the ingress and egress traffic use the same interface. We configured the U-turn nat on the Cisco ASA firewall and accessed our dmz server using a public IP Address. Further, we performed the same steps for the Inside Web server.
Did you find this article helpful? Please share this on social media platforms and show us some love