This tutorial will configure AnyConnect Remote access VPN on the Cisco ASA Firewall. AnyConnect, a Cisco SSL VPN client, supports IPSec and SSL connectivity. We will configure full-tunnel and split-tunnel configurations on Cisco ASA for AnyConnect VPN. Let’s get started!

Prerequisites
You must have read-write access to the Cisco ASA Firewall. Further, to test AnyConnect VPN connectivity, you should have hosts inside and outside your organization.
Before configuring the Anyconnect VPN, let’s understand our Lab setup.
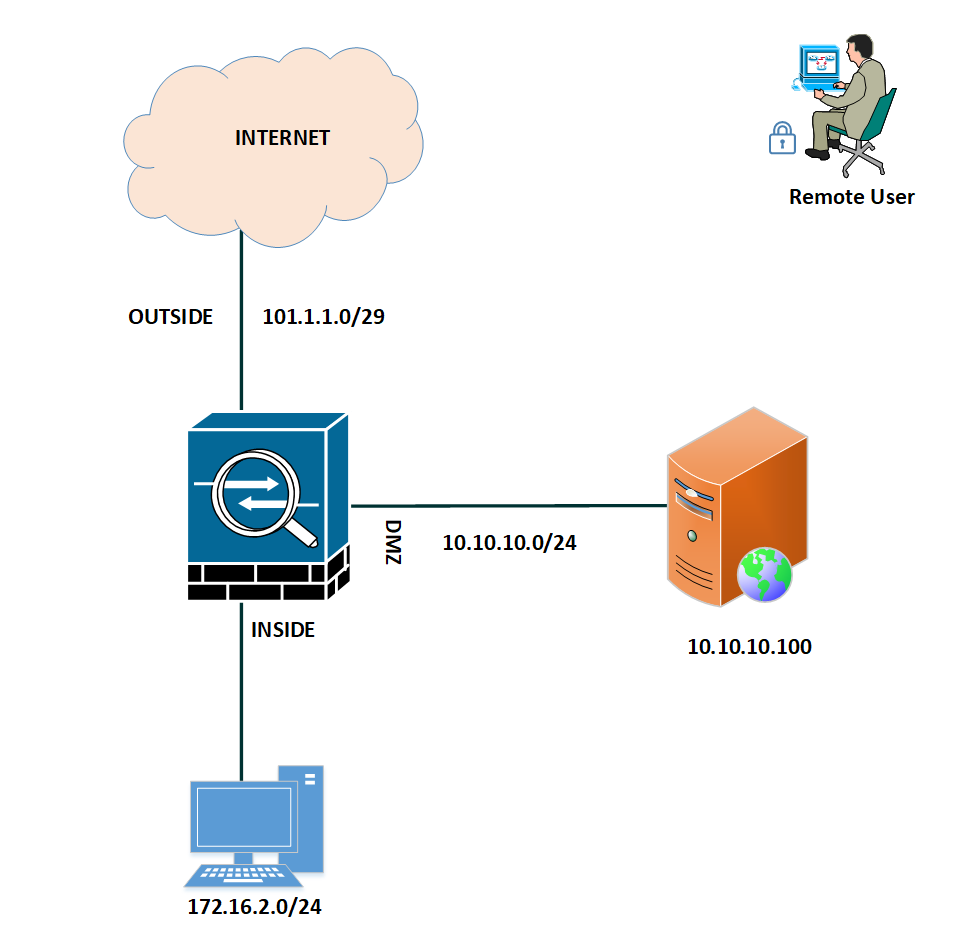
We have a Cisco ASA firewall connected with an Internet Service Provider (ISP). Two additional interfaces are configured for Inside and DMZ.
Split-Tunnel vs Full Tunnel
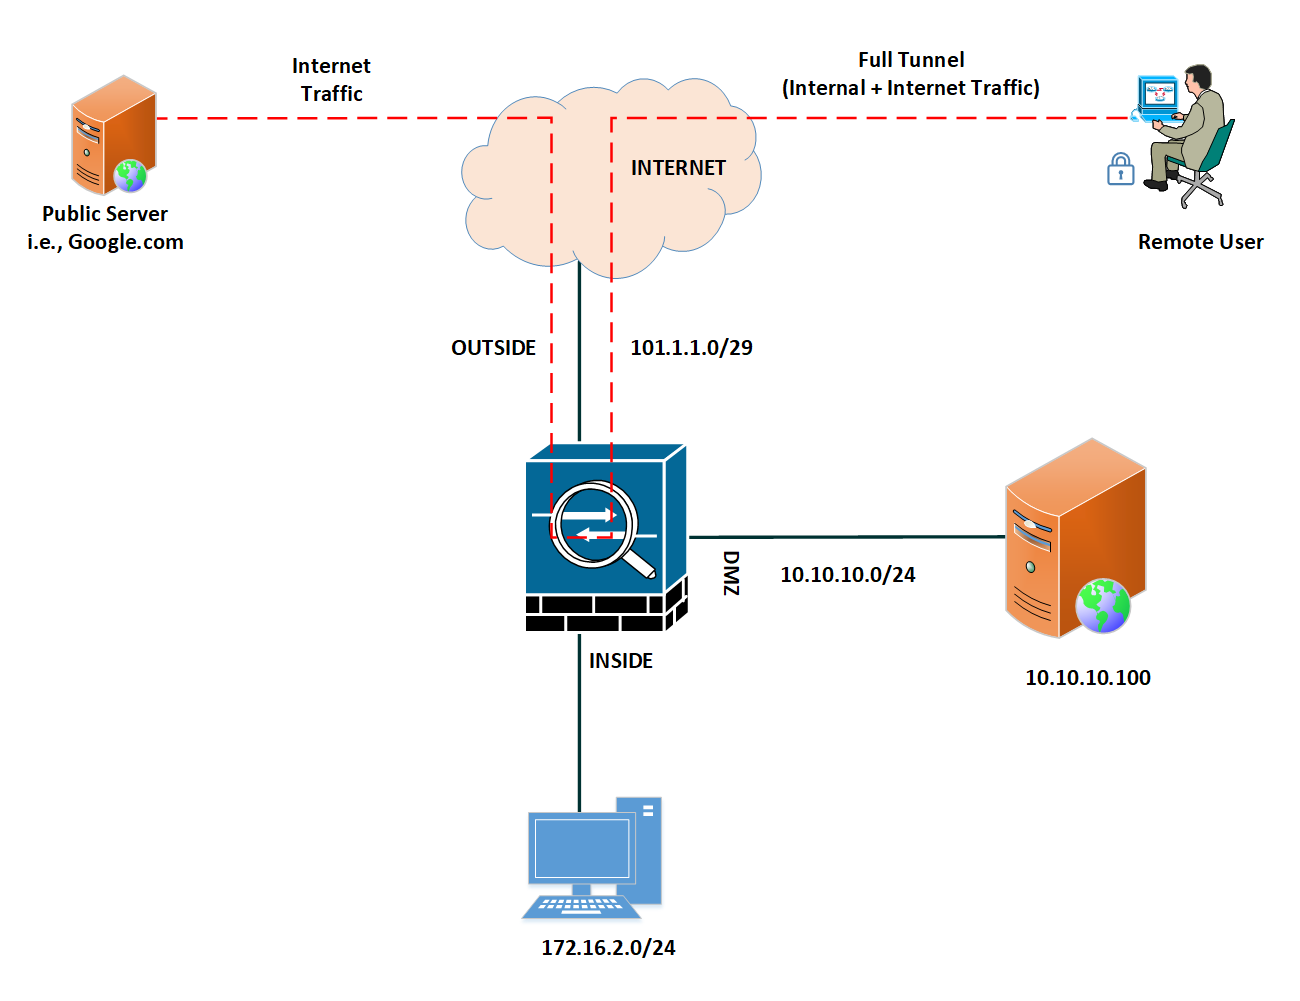
Remote access VPNs, such as AnyConnect, can be configured in two ways, i.e., Split-Tunnel and Full-Tunnel.
In Full-Tunnel, we route all of the network traffic toward the firewall. So, if a user has to access the Public Internet, it will first go to the gateway and then route the traffic to their ISP. SSL VPN clients will configure a default route, i.e., 0.0.0.0/0, in the host’s routing table.
In Split Tunnel, we only configure private networks for the SSL VPN clients. So, if a user needs to access internal servers, the traffic will route through the VPN. All of their Internet traffic will go directly without reaching the firewall.
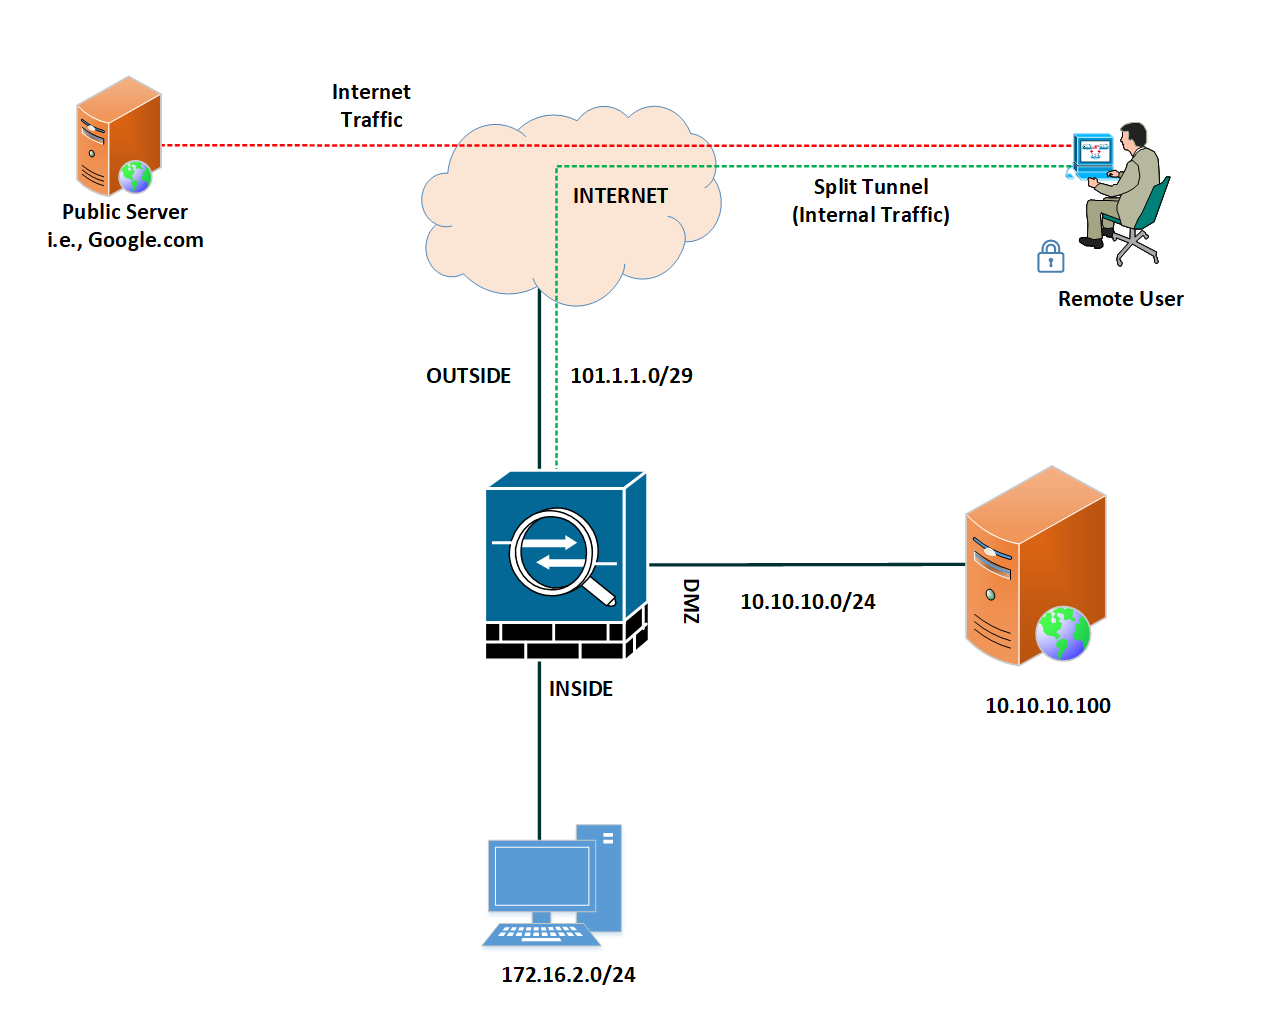
First, we will configure a Full tunnel VPN, and later in this article, we will see examples of split tunnels.
Cisco ASA Firewall Initial Configuration
We will perform the initial configurations on the Cisco ASA Firewall. First, we will configure the network interface, and further, we will set up different configurations for AnyConnect.
Setting up Cisco ASA Interfaces
interface GigabitEthernet0/0
nameif outside
security-level 0
ip address 101.1.1.1 255.255.255.248
!
interface GigabitEthernet0/1
nameif inside
security-level 100
ip address 172.16.2.1 255.255.255.0
!
interface GigabitEthernet0/2
nameif dmz
security-level 50
ip address 10.10.10.1 255.255.255.0
Now, add a default route on ASA towards the ISP:
route outside 0.0.0.0 0.0.0.0 101.1.1.2
Now, we will configure the AnyConnect VPN configuration.
Step 1: Downloading the AnyConnect VPN client and uploading on Cisco ASA
To ensure users can download the Any Connect client directly by accessing the firewall web vpn page, ensure you have a valid AnyConnect package on the Cisco ASA.
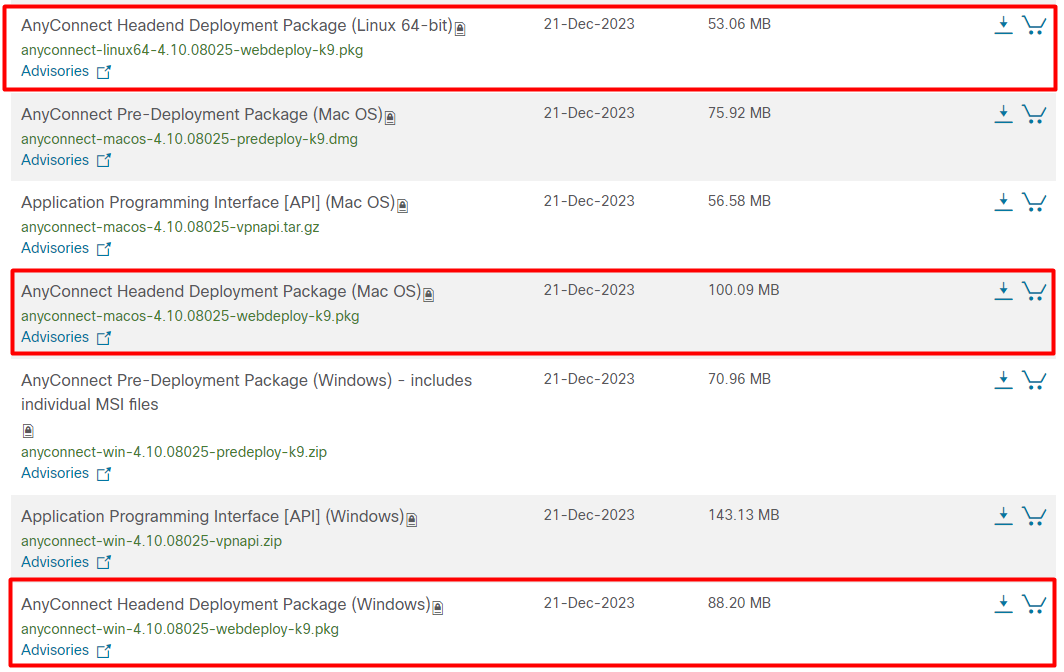
To download the AnyConnect image, you can visit the Cisco software and download it for free.
Once you have these files, you can upload them to the ASA via different methods. I will use the http server to upload these files in ASA.
ciscoasa# copy http: disk0:

Address or name of remote host []? 10.10.10.100

Source filename []? anyconnect-win-4.4.02039-webdeploy-k9.pkg

Destination filename [anyconnect-win-4.4.02039-webdeploy-k9.pkg]?

Accessing http://10.10.10.100/anyconnect-win-4.4.02039-webdeploy-k9.pkg...!!!!!!!!!!!!!!!!!!!!!!!!!!!!!!!!!!!!!
Writing file disk0:/anyconnect-win-4.4.02039-webdeploy-k9.pkg...
!!!!!!!!!!!!!!!!!!!!!!!!!!!!!
30076867 bytes copied in 3.500 secs (10025622 bytes/sec)
Now, you should have AnyConnect image in the disk partition:
ciscoasa# show disk0:
--#-- --length-- -----date/time------ path
10 4096 Nov 13 2023 21:37:56 smart-log
11 8777 Jan 11 2024 15:51:38 smart-log/agentlog
7 4096 Nov 13 2023 21:36:40 log
9 1250 Jan 10 2024 13:45:59 log/asa-appagent.log
12 4096 Nov 13 2023 21:38:00 coredumpinfo
13 59 Nov 13 2023 22:07:42 coredumpinfo/coredump.cfg
79 7667 Nov 13 2023 22:30:16 object
94 30076867 Jan 11 2024 18:20:55 q
90 6591 Jan 11 2024 15:50:10 base-config
95 30076867 Jan 11 2024 18:22:22 anyconnect-win-4.4.02039-webdeploy-k9.pkg
Now, we can move to the next steps.
Step 2: Configuring the AnyConnect VPN IP Pool and Users to Authenticate on Cisco ASA
We must configure the IP pool for AnyConnect VPN users. Cisco ASA allows us to define the IP Pools for different purposes. You can hit the below command to configure an IP Pool for SSL VPN:
ip local pool anyconnect-vpn-pool 192.168.90.10-192.168.90.100 mask 255.255.255.0
Let’s also configure a network object to use in NAT and ACLs:
object network anyconnect-vpn-subnet
range 192.168.90.10 192.168.90.100
We can use a local user database or a remote authentication server, such as Radius, Tacaces+, etc.
For this example, we will use only the local user database. To create a user on Cisco ASA, hit the below command in global configuration mode:
username user1 password Passw0rd
Additionally, we need to set the user attribute to use it for remote access authentication.
username user1 attributes
service-type remote-access
Step 3: Configuring the Group Policy on Cisco ASA for SSL VPN
On Cisco ASA, Group policy allows us to configure different parameters for Remote Access. A few parameters are DNS, full-tunnel, split-tunnel, configurations, etc.
To configure Group Policy, you can execute the below commands in global configuration mode:
group-policy ssl-vpn-policy internal
group-policy ssl-vpn-policy attributes
dns-server value 10.10.10.50
vpn-tunnel-protocol ssl-client
Step 4: Configuring the Tunnel Group on Cisco ASA for AnyConnect SSL VPN
Tunnel Group allows us to bind the IP Pool and Group Policy configurations defined in previous steps. Execute the below commands to create a tunnel group and assign the group policy and VPN IP Pool.
tunnel-group ssl-vpn-tunnel-group type remote-access
tunnel-group ssl-vpn-tunnel-group general-attributes
address-pool anyconnect-vpn-pool
default-group-policy ssl-vpn-policy
Now, configure the web VPN attributes for this tunnel group.
tunnel-group ssl-vpn-tunnel-group webvpn-attributes
group-alias Internal-VPN enable
Step 5: Enabling the Web VPN and Cisco AnyConnect on the Outside Interface
This is the last step of the Cisco AnyConnect VPN configuration. First, we will enable the Web VPN on the Outside interface. Further, we need to enable the AnyConnect VPN on the outside interface.
webvpn
enable outside
anyconnect image disk0:/anyconnect-win-4.4.02039-webdeploy-k9.pkg 1
anyconnect enable
tunnel-group-list enable
Now, you should access the internal resources using a remote access VPN.
Step 6: Configuring the ACLs (Access Control List) to and NAT for AnyConnect SSL VPN Traffic
Since we configured Full-Tunnel Remote VPN, the internet traffic will hit the outside interface and go again to the ISP through the same interface. So, we must configure Hairpin NAT on Cisco ASA to send this traffic to the ISP. You can use the below command to configure a Hairpin NAT for this traffic:
nat (outside,outside) source dynamic anyconnect-vpn-subnet interface
Since the traffic is getting in and out from the same interface, we must allow the same security-level traffic on ASA.
same-security-traffic permit intra-interface
That’s it. Now, you should connect to the ASA using AnyConnect and access inside and internet resources through the firewall.
Step 7: Verifying the Cisco AnyConnect SSL VPN Connectivity
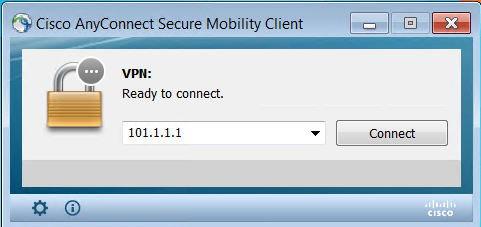
Now, go to your remote computer and try to access the outside interface IP Address, i.e., https://101.1.1.1. You should get a Web VPN page with an authentication prompt.
Sign in using the defined credentials, i.e., user1, and proceed with the Cisco AnyConnection installation. Once completed, try to connect the SSL VPN on 101.1.1.1.
If you noticed, we haven’t defined any certificate throughout the configuration. This means we are using a factory default certificate. By default, if you connect to AnyConnect, you will get the below warning message: Untrusted Server BLocked! AnyConnect cannot verify server: 101.1.1.1.
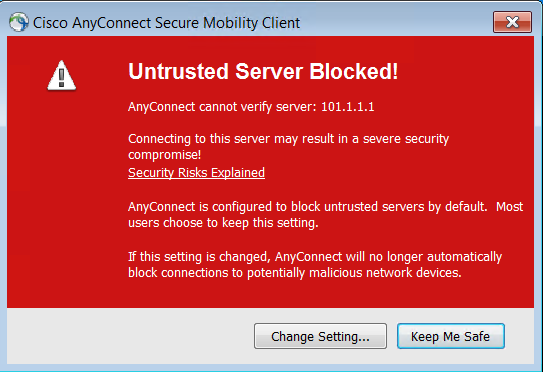
You can click on the change setting and unselect block connection to untrusted servers. You will get another warning due to the factory default certificate.
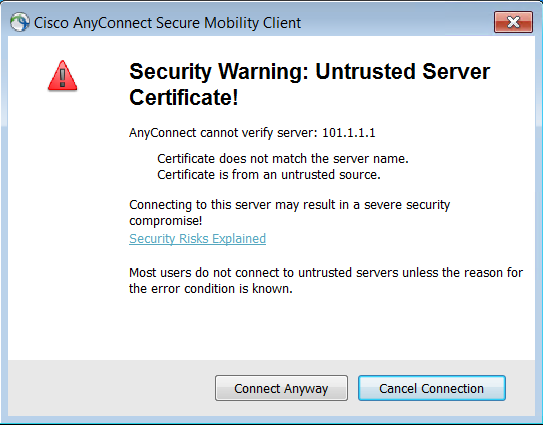
Once you click Connect Anyway, you need to log in with your credentials.
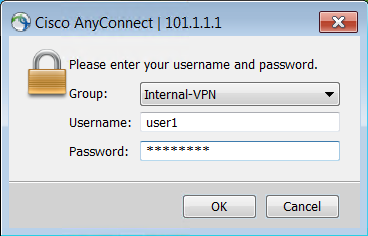
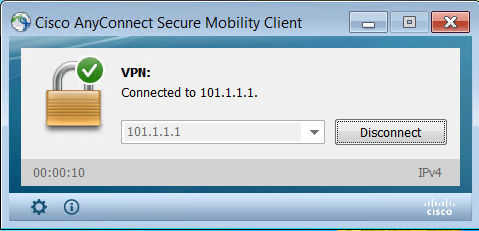
Finally, AnyConnect VPN should connect.
Let’s try to access the Internal Web Server from the external PC:
C:\Users\admin>ping 10.10.10.100

Pinging 10.10.10.100 with 32 bytes of data:
Reply from 10.10.10.100: bytes=32 time=1ms TTL=64
Reply from 10.10.10.100: bytes=32 time=1ms TTL=64
Reply from 10.10.10.100: bytes=32 time=42ms TTL=64
Reply from 10.10.10.100: bytes=32 time=20ms TTL=64

Ping statistics for 10.10.10.100:
Packets: Sent = 4, Received = 4, Lost = 0 (0% loss),
Approximate round trip times in milli-seconds:
Minimum = 1ms, Maximum = 42ms, Average = 16ms
Since we are using a full-tunnel VPN, Let’s try to access the internet:
Pinging 8.8.8.8 with 32 bytes of data:
Reply from 8.8.8.8: bytes=32 time=72ms TTL=113
Reply from 8.8.8.8: bytes=32 time=74ms TTL=113
Reply from 8.8.8.8: bytes=32 time=56ms TTL=113
Reply from 8.8.8.8: bytes=32 time=76ms TTL=113

Ping statistics for 8.8.8.8:
Packets: Sent = 4, Received = 4, Lost = 0 (0% loss),
Approximate round trip times in milli-seconds:
Minimum = 56ms, Maximum = 76ms, Average = 69ms
Step 8: Enabling the split tunnel for SSL VPN on Cisco ASA
To enable a split tunnel, first, define the interested traffic using an ACL. We have two different subnets, i.e., Inside and DMZ, that we will access through the Remote VPN. Let’s create a standard ACL by hitting the below command:
access-list anyconnect-vpn-networks standard permit 172.16.2.0 255.255.255.0
access-list anyconnect-vpn-networks standard permit 10.10.10.0 255.255.255.0
Now, add this access list to the group policy created earlier.
group-policy ssl-vpn-policy attributes
split-tunnel-policy tunnelspecified
split-tunnel-network-list value anyconnect-vpn-networks
Now, let’s try to connect to the AnyConnect VPN and check the routes. You will only get 172.16.2.0/24 and 10.10.10.0/24 networks. You will also get the 10.10.10.50/32 route of the internal DNS server.

Further Reading
- Cisco ASA Firewall – Hairpin or U-turn NAT
- IPSec tunnel between Palo Alto Networks Firewall and Ubuntu
- How to configure IPSec tunnel on Ubuntu using strongSwan
- Cisco ASA: Security Levels and Zones Explained
- Configure Cisco ASA Firewalls for ASDM Access
Conclusion
Cisco AnyConnect VPN is a Remote Access VPN solution that can easily connect with ASA and other firewalls and provide secure access to internal resources. First, we uploaded the AnyConnect Image on ASA, then defined the IP Pool and users. Further, we configured the Group and Tunnel Policy. Last, we applied the Hairpin NAT to forward the full-tunnel traffic to the ISP.
Did you find this article helpful? Please share it on social media platforms and show us some love 🙂