Apache is the most popular open-source, feature-rich Web Server. More than half of active websites deployed on Apache Web Server. It is a cross-platform server and can be deployed on Linux and Windows. It is highly customizable, and we can easily integrate it with the different modules to match the web application requirements. In this web tutorial, we will configure the Apache web server on Ubuntu 22.04.

Prerequisites
To install the Apache web server, you need a regular non-root user account with sudo privileges. Additionally, you need to allow the incoming traffic on your web server. If the prerequisites match, let’s begin the installation process.
Installation of the Apache Server
We will start the Apache web server installation by updating the index of locally installed packages.
firewallbuddy@ubuntu:~$ sudo apt update
Once it completes, run the below command to install the Apache Server
firewallbuddy@ubuntu:~$ sudo apt install apache2
Once you execute this command, the system will ask for a user confirmation regarding the installation.
Reading package lists... Done
Building dependency tree... Done
Reading state information... Done
The following additional packages will be installed:
  apache2-bin apache2-data apache2-utils libapr1 libaprutil1 libaprutil1-dbd-sqlite3 libaprutil1-ldap
Suggested packages:
  apache2-doc apache2-suexec-pristine | apache2-suexec-custom
The following NEW packages will be installed:
  apache2 apache2-bin apache2-data apache2-utils libapr1 libaprutil1 libaprutil1-dbd-sqlite3 libaprutil1-ldap
0 upgraded, 8 newly installed, 0 to remove and 173 not upgraded.
Need to get 1,919 kB of archives.
After this operation, 7,718 kB of additional disk space will be used.
Do you want to continue? [Y/n]
Hit y or yes to proceed with the installation process. Now, the system will start the installation of Apache2 and related dependencies.
At this point, the Apache server should be installed on your Ubuntu server. To verify the installation, hit the below command:
firewallbuddy@ubuntu:~$ apache2 -version
Server version: Apache/2.4.52 (Ubuntu)
Server built:   2023-10-26T13:44:44
Allowing the incoming web traffic on Ubuntu UFW
Before testing the Apache web server, we should allow the incoming web traffic on the UFW (Uncomplicated Firewall). By default, once you install an application, i.e., Apache, it registers itself with UFW. Now, we can allow the traffic for this application in a single command.
To view the current status of the allowed application through UFW, hit the below command:
firewallbuddy@ubuntu:~$ sudo ufw status
Status: active

To                         Action      From
--                         ------      ----
OpenSSH                    ALLOW       Anywhere
OpenSSH (v6)               ALLOW       Anywhere (v6)
To view all of the registered applications with UFW, you can hit the below command:
firewallbuddy@ubuntu:~$ sudo ufw app list
Available applications:
  Apache
  Apache Full
  Apache Secure
  CUPS
  OpenSSH
- Apache – To allow traffic on port TCP/80.
- Apache Secure – To allow traffic on port TCP/443
- Apache Full – To allow traffic on ports TCP/443 & TCP/80
It is always recommended to allow restricted traffic. Here, we will allow access to both TCP/80 & TCP/443 to understand the working with SSL.
firewallbuddy@ubuntu:~$ sudo ufw allow 'Apache Full'
Rule added
Rule added (v6)
If you rerun the previous command, you will find that Apache Full is now allowed in UFW.
firewallbuddy@ubuntu:~$ sudo ufw status
Status: active

To                         Action      From
--                         ------      ----
OpenSSH                    ALLOW       Anywhere
Apache Full                ALLOW       Anywhere
OpenSSH (v6)               ALLOW       Anywhere (v6)
Apache Full (v6)           ALLOW       Anywhere (v6)
This output shows that the Apache traffic is now allowed by the UFW.
Testing the Apache Server configured on Ubuntu 22.04
If the installation process is completed successfully, the Apache server should be run and running. Let’s verify the Apache Service status using the below command:
firewallbuddy@ubuntu:~$ service apache2 status
● apache2.service - The Apache HTTP Server
     Loaded: loaded (/lib/systemd/system/apache2.service; enabled; vendor preset: enabled)
     Active: active (running) since Thu 2023-12-21 19:13:36 IST; 1h 0min ago
       Docs: https://httpd.apache.org/docs/2.4/
   Main PID: 8823 (apache2)
      Tasks: 55 (limit: 2262)
     Memory: 4.8M
        CPU: 422ms
     CGroup: /system.slice/apache2.service
             ├─8823 /usr/sbin/apache2 -k start
             ├─8825 /usr/sbin/apache2 -k start
             └─8826 /usr/sbin/apache2 -k start
Now, let’s extract the IP Address of your Ubuntu machine and try to access it using http://IP_Address. We can retrieve the Linux IP Addresses using one of the below commands:
firewallbuddy@ubuntu:~$ hostname -I
192.168.225.138
To print an exact IP Address without any loopback IP, you can use the below command:
firewallbuddy@ubuntu:~$ ip addr | grep -Po '(?!(inet 127.\d.\d.1))(inet \K(\d{1,3}\.){3}\d{1,3})'
192.168.225.138
firewallbuddy@ubuntu:~$
You can also use the ifconfig utility to check the IP Addresses:
firewallbuddy@ubuntu:~$ ifconfig
enp0s3: flags=4163<UP,BROADCAST,RUNNING,MULTICAST>  mtu 1500
        inet 192.168.225.138  netmask 255.255.0.0  broadcast 192.168.255.255
        inet6 fe80::5209:8639:73bd:86b6  prefixlen 64  scopeid 0x20<link>
        ether 08:00:27:14:c0:6f  txqueuelen 1000  (Ethernet)
        RX packets 53548  bytes 32865985 (32.8 MB)
        RX errors 0  dropped 0  overruns 0  frame 0
        TX packets 16907  bytes 2503882 (2.5 MB)
        TX errors 0  dropped 0 overruns 0  carrier 0  collisions 0
Once you have the IP Address, type this in the browser address bar, i.e., http://192.168.225.138. You should get the default Apache Page.
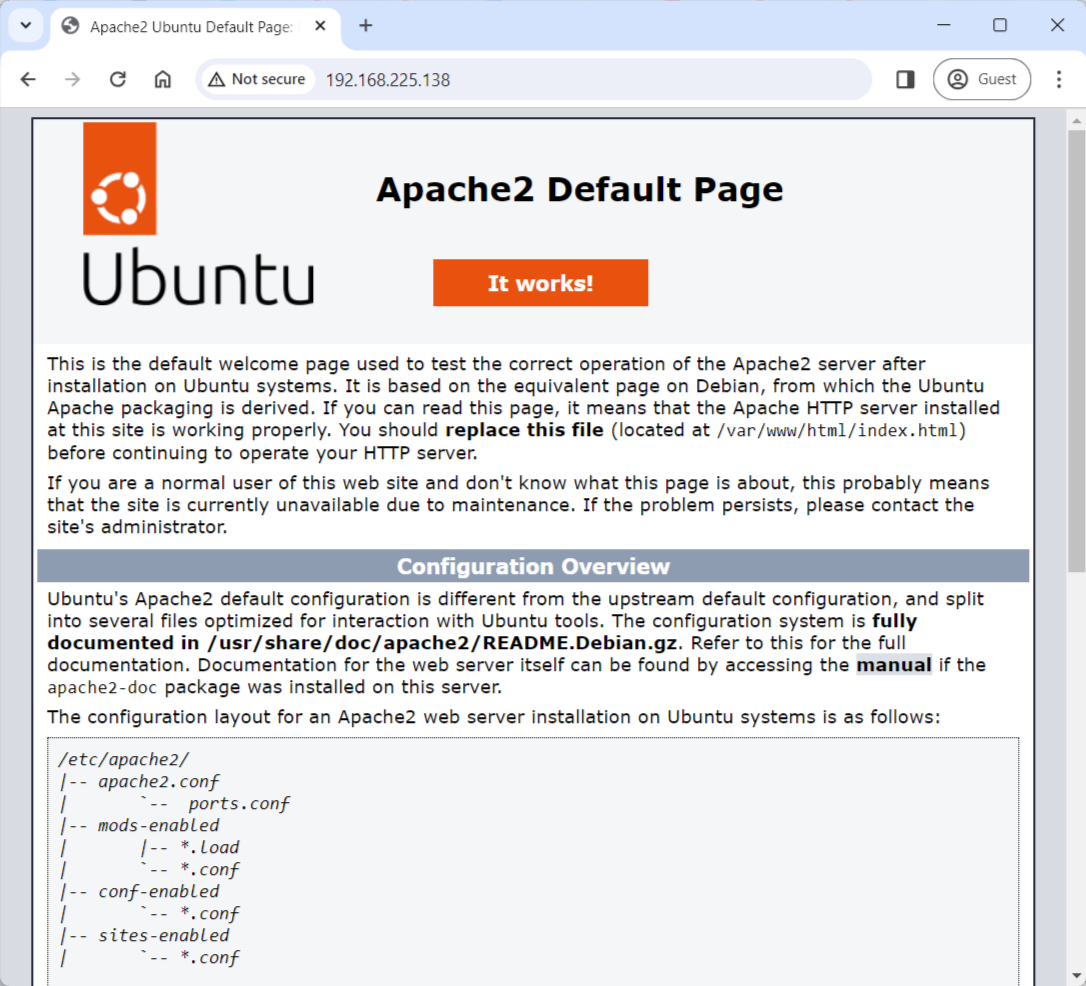
This page confirms that the Apache is working. It also shows some directories related to the Apache. We will discuss these directories later in this article.
Managing the Apache Server on Ubuntu
In this section, we will discuss the different commands that help you in managing the Apache Server. By default, the Apache service starts after the installation. However, it’s also important to have some ideas related to the management of Apache.
To stop the Apache services, you can type the following command:
firewallbuddy@ubuntu:~$ sudo systemctl stop apache2.service
Similarly, you can use start instead of stop to start the Apache services:
firewallbuddy@ubuntu:~$ sudo systemctl start apache2.service
To restart the services, you can either stop it first and then start it. Alternatively, you can use a single restart command:
firewallbuddy@ubuntu:~$ sudo systemctl restart apache2.service
The Apache services start with the machine startup. However, you can change this behavior using the below command:
firewallbuddy@ubuntu:~$ sudo systemctl disable apache2.service
To re-enable the Apache services on startup, you can hit the below command:
firewallbuddy@ubuntu:~$ sudo systemctl enable apache2.service
Configuring the Virtual Hosts on the Apache Web Server
It is always recommended to configure Virtual Hosts on the Apache web server. This allows us to host more than one domain in a single web server.
You will find the Virtual Hosts configuration under the/etc/apache2/sites-available/.
firewallbuddy@ubuntu:~$ ls -l /etc/apache2/sites-available/
total 12
-rw-r--r-- 1 root root 1332 May  4  2023 000-default.conf
-rw-r--r-- 1 root root 6338 May  4  2023 default-ssl.conf
As you can see, we have default virtual host configuration files that serve the default Apache page. Virtual Hosts file also indicates the root directory of the web server, where, we have our web pages available.
firewallbuddy@ubuntu:~$ cat /etc/apache2/sites-available/000-default.conf | grep DocumentRoot
DocumentRoot /var/www/html
The above output confirms that the default pages are available under the /var/www/html/ directory.
We will configure an additional domain using the Virtual Hosts on Apache. In this example, we will configure the example.com domain and set up the virtual hosts on Apache Server.
Let’s start by configuring the domain directory by hitting the below command:
sudo mkdir -p /var/www/example.com
Now, let’s create an HTML file, i.e., index.html under the /var/www/example.com/ directory and define a web page.
sudo touch /var/www/example.com/index.html
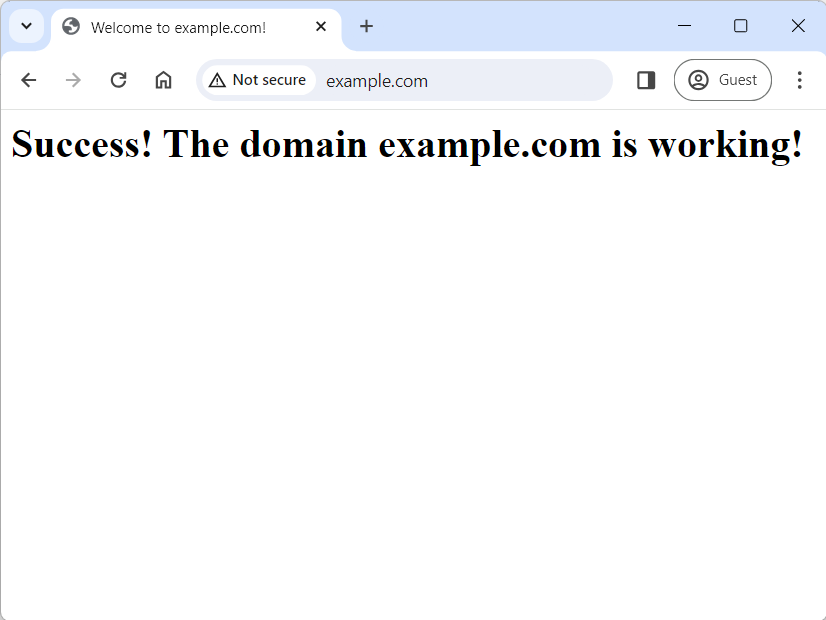
Edit this page using a text editor and add some sample lines.
<html>
    <head>
        <title>Welcome to example.com!</title>
    </head>
    <body>
        <h1>Success! The domain example.com is working!</h1>
    </body>
</html>
Finally, change the owner of the domain directory to www-data by hitting the below command:
firewallbuddy@ubuntu:~$ sudo chown -R www-data:www-data /var/www/example.com/
Now, we need to define the virtual hosts to access this domain.
We will use the below command to create a custom Virtual Hosts file for the example.com:
sudo touch /etc/apache2/sites-available/example.com.conf
You can add the minimum configuration to the newly created Virtual Host file. Edit the /etc/apache2/sites-available/example.com.conf using a text editor and add below content:
<VirtualHost *:80>
    DocumentRoot /var/www/example.com
    ServerName example.com
    <Directory "/var/www/example.com">
      Options -Indexes +FollowSymLinks -MultiViews
      AllowOverride All
      Require all granted
    </Directory>
</VirtualHost>
Optionally, you can add another Virtual Host file to access the domain example.com using SSL.
<VirtualHost *:80>
    DocumentRoot /var/www/example.com
    ServerName example.com
    SSLEngine on
    SSLCertificateFile "/etc/ssl/certs/example.com.crt"
    SSLCertificateKeyFile "/etc/ssl/certs/example.com.key"
    <Directory "/var/www/example.com">
      Options -Indexes +FollowSymLinks -MultiViews
      AllowOverride All
      Require all granted
    </Directory>
</VirtualHost>
Lastly, we will use the a2ensite tool to enable the domain example.com. Replace the example.com with your domain.
firewallbuddy@ubuntu:~$ sudo a2ensite example.com.conf
To disable the default Apache domain page defined in 000-default.conf, use the a2dissite and hit the below command:
firewallbuddy@ubuntu:~$ sudo a2dissite 000-default.conf
Reload the Apache Server to make the changes effective:
firewallbuddy@ubuntu:~$ sudo systemctl reload apache2.service
Managing the DNS Records and verifying the Virtual Hosts configuration by accessing the newly created domain
You can create a DNS mapping to access your custom application using fqdn. You can configure A record (Address record) on your domain provider portal.
If you can’t access the domain provider portal, add a DNS entry in your system “hosts” file.
For Linux systems, use the below command to add a localhost entry:
sudo echo "172.20.10.2 example.com" >> /etc/hosts
For the Windows system, edit the C:\Windows\System32\drivers\etc\hosts file using a text editor with administrative privileges.
Finally, test the configuration by accessing http://example.com in your web browser. You should receive a web page that we have configured earlier.
Important directories for Apache in Ubuntu
In this section, we will understand important directories related to Apache. You can use these directories to define the contents and manage Virtual Hosts for additional domains.
1. /var/www/ – This is the default directory for the Apache Web Server. All server contents are available in this directory. If you notice, we have defined a different domain under this directory.
2. /etc/apache2/ – This directory contains important files related to the server. This directory contains configuration files such as apache2.conf.
3. /etc/apache2/sites-available/ – This directory has all the sites configured on Apache. This directory also included the sites that are currently disabled.
4. /etc/apache2/sites-enabled/ – This directory have only enabled sites. The disabled sites can be enabled using the a2ensite utility.
5. /var/log/apache2/ – This directory has multiple files including, access.log & error.log that help us in troubleshooting the Apache web server.
Further Reading
- Custom Application on Bitnami using Virtual Hosts & Apache
- How to install Apache Web Server on CentOS 7
- How to generate SSL SAN Certificate CSR using OpenSSL
- How to configure IPSec tunnel on Ubuntu using strongSwan
Conclusion
We have successfully configured the Apache on Ubuntu 22.04 server. We enabled an additional domain using the Virtual Hosts. Further, we saw different examples of Virtual Hosts for SSL and non-SSL configuration.
Did you find this article helpful? Please comment in the comment box for the issues related to the Apache.