Hot Standby Routing Protocol (HSRP) is a Cisco proprietary protocol that provides redundancy in computer networks. In this article, we will discuss and configure HSRP on Cisco devices. Before moving to the HSRP discussion and configuration, let’s first understand the single point of failure.
Single point of failure in computer networks
To understand the single point of failure, let’s start with a simple example:
Look at this topology having a host connected with a layer two switch. This switch is further connected with two routers, i.e., R1 and R2. The Host behind the switch can have only one default gateway. Assume that we have configured the R1 IP address as a default gateway on the Host. The Host can access the internet via R1, and we don’t have any issues at all.
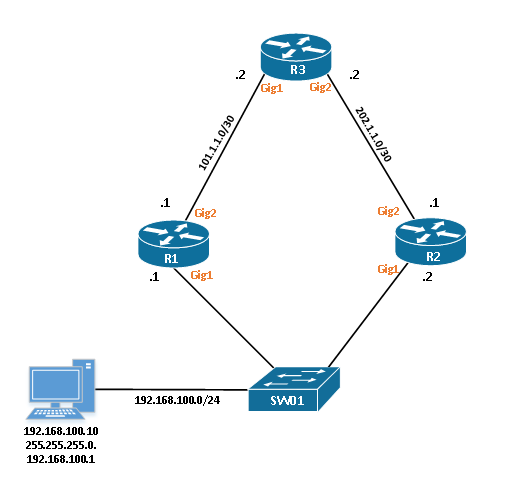
Now, due to any random reason, R1 goes unresponsive and is unable to process any network traffic from the Host. In this case, we must switch the default gateway to R2 to make the internet work. Again, the internet starts working on the end computer.

However, the switching of the default gateway causes a significant amount of downtime in the network. Further, a single administrator can’t change the default gateways on all LAN computers.
We can use the different FHRP (First-hop redundancy protocol) protocols to avoid downtime. HSRP is one of the FHRP protocols.
What is HSRP?
HSRP stands for Hot Standby Routing Protocol and is a Cisco proprietary protocol. It provides redundancy in computer networks and avoids a single point of failure. In HSRP, we deploy two or more routers in a group. In case of active router failure, the standby router immediately starts forwarding the network traffic and avoids downtime.
Routers in the HSRP group share an IP and MAC address. This IP address is considered the default gateway for the Hosts in LAN.
HSRP Messages
To participate in HSRP, routers send a couple of messages to each other. In this section, we will discuss these messages in detail:
Hello Messages: By default, Active and Standby devices keep sending the Hello Messages with each other. It determines the HSRP configuration and status of the peer device. If the device doesn’t get the Hello message within 10 seconds, it takes over the active role.
Resign: This message is always sent by the active HSRP device. It tells the peer router it is going offline or giving up the active role. This way, the peer device will take the active role and forward the packets.
Coup: This message is available in case of preemption. The standby router informs the active router that it will take the active role and start forwarding the traffic.
In HSRP version 1, these messages use the multicast IP address 224.0.0.2. However, in version 2, the multicast address changed to 224.0.0.102.
Apart from IP Address, HSRP uses 0000.0c07.acXX for version 1 and 0000.0c9f.fXXX MAC address on version 2. XX, XXX is the group number of HSRP.
HSRP States
In this section, we will discuss the different states of HSRP. Routers that are participating in HSRP will go through all of the states.
[wptb id=769]
HSRP Configuration on Cisco Router / Multilayer Switch
In this section, we will configure HSRP on Cisco routers. You can apply the same configuration on the Multilayer switch. For this configuration, we will use the below simple topology:
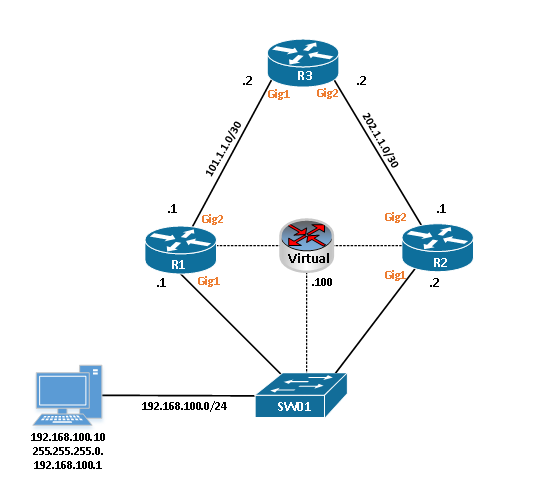
We have R1, R2, R3, Switch01, and a Windows Host. Let’s start the configuration by confirming the interfaces of the routers:
Rouer R1:
interface GigabitEthernet1
ip address 192.168.100.1 255.255.255.0
negotiation auto
!
interface GigabitEthernet2
ip address 101.1.1.1 255.255.255.252
negotiation auto
Router R2:
interface GigabitEthernet1
ip address 192.168.100.2 255.255.255.0
negotiation auto
!
interface GigabitEthernet2
ip address 201.1.1.1 255.255.255.252
negotiation auto
Finally, Router R3:
interface GigabitEthernet1
ip address 101.1.1.2 255.255.255.252
negotiation auto
!
interface GigabitEthernet2
ip address 201.1.1.2 255.255.255.252
negotiation auto
Now, enable the HSRP on both R1 and R2. Go to the fa0/0 interface of both devices and execute the below command:
R1(config)#interface gigabitEthernet 1
R1(config-if)#standby 1 ip 192.168.100.100
Similarly, on R2:
R2(config)#interface gigabitEthernet 1
R2(config-if)#standby 1 ip 192.168.100.100
The HSRP is enabled on both of the devices. We have also defined the virtual gateway IP address, i.e., 192.168.100.100. Also, the 10 in the standby command is the HSRP group. This group must be the same on both of the devices.
You will get the below information on the Router console:
*Jan 1 07:33:04.074: %HSRP-5-STATECHANGE: GigabitEthernet1 Grp 1 state Speak -> Standby
*Jan 1 07:32:43.882: %HSRP-5-STATECHANGE: GigabitEthernet1 Grp 1 state Standby -> Active
You should enable the HSRP debugs in case of troubleshooting. Debugs will show you the complete HSRP states of the routers:
R1#debug standby events
*Jan 1 09:05:20.829: HSRP: Gi1 Interface UP
*Jan 1 09:05:20.829: HSRP: Gi1 Starting minimum intf delay (1 secs)
*Jan 1 09:05:21.139: HSRP: Gi1 ARP reload
*Jan 1 09:05:21.828: HSRP: Gi1 Intf min delay expired
*Jan 1 09:05:21.828: HSRP: Gi1 Grp 1 Init: a/HSRP enabled
*Jan 1 09:05:21.828: HSRP: Gi1 Grp 1 Init -> Listen
*Jan 1 09:05:21.829: HSRP: Peer not present
*Jan 1 09:05:21.829: HSRP: Gi1 Grp 1 Redundancy "hsrp-Gi1-1" state Init -> Backup
*Jan 1 09:05:21.829: HSRP: Gi1 IP Redundancy "hsrp-Gi1-1" update, Init -> Backup
*Jan 1 09:05:32.997: HSRP: Gi1 Grp 1 Listen: d/Standby timer expired (unknown)
*Jan 1 09:05:32.997: HSRP: Gi1 Grp 1 Listen -> Speak
*Jan 1 09:05:32.997: HSRP: Peer not present
*Jan 1 09:05:32.997: HSRP: Gi1 Grp 1 Redundancy "hsrp-Gi1-1" state Backup -> Speak
*Jan 1 09:05:32.997: HSRP: Gi1 IP Redundancy "hsrp-Gi1-1" update, Backup -> Speak
*Jan 1 09:05:44.291: HSRP: Gi1 Grp 1 Speak: d/Standby timer expired (unknown)
*Jan 1 09:05:44.291: HSRP: Gi1 Grp 1 Standby router is local
*Jan 1 09:05:44.291: HSRP: Gi1 Grp 1 Speak -> Standby
*Jan 1 09:05:44.291: %HSRP-5-STATECHANGE: GigabitEthernet1 Grp 1 state Speak -> Standby
*Jan 1 09:05:44.291: HSRP: Peer not present
*Jan 1 09:05:44.291: HSRP: Gi1 Grp 1 Redundancy "hsrp-Gi1-1" state Speak -> Standby
*Jan 1 09:05:44.291: HSRP: Gi1 IP Redundancy "hsrp-Gi1-1" standby, unknown -> local
*Jan 1 09:05:44.291: HSRP: Gi1 IP Redundancy "hsrp-Gi1-1" update, Speak -> Standby
Finally, go to the Host and assign the IP Address per our topology. Check the IP Address on your Host using ipconfig, and try to ping the virtual gateway.
C:\Documents and Settings\admin>ipconfig
Ethernet adapter Local Area Connection:

Connection-specific DNS Suffix . :
IP Address. . . . . . . . . . . . : 192.168.100.10
Subnet Mask . . . . . . . . . . . : 255.255.255.0
Default Gateway . . . . . . . . . : 192.168.100.100
You should get the ping response from Virtual Gateway with the default TTL 225.
C:\Documents and Settings\admin>ping 192.168.100.100

Pinging 192.168.100.100 with 32 bytes of data:

Reply from 192.168.100.100: bytes=32 time=3ms TTL=255
Reply from 192.168.100.100: bytes=32 time<1ms TTL=255
Reply from 192.168.100.100: bytes=32 time<1ms TTL=255
Reply from 192.168.100.100: bytes=32 time<1ms TTL=255
You will find the HSRP MAC address in the ARP table.
C:\Documents and Settings\admin>arp -a

Interface: 192.168.100.10 --- 0x20002
Internet Address Physical Address Type
192.168.100.100 00-00-0c-07-ac-01 dynamic
Managing the HSRP on Cisco Devices
In this section, we will discuss some of the important commands to manage the HSRP. We will start with the show standby command, which shows complete information on HSRP.
R1#show standby
GigabitEthernet1 - Group 1
State is Standby
3 state changes, last state change 00:14:43
Virtual IP address is 192.168.100.100
Active virtual MAC address is 0000.0c07.ac01 (MAC Not In Use)
Local virtual MAC address is 0000.0c07.ac01 (v1 default)
Hello time 3 sec, hold time 10 sec
Next hello sent in 2.256 secs
Preemption disabled
Active router is 192.168.100.2, priority 100 (expires in 8.624 sec)
Standby router is local
Priority 100 (default 100)
Group name is "hsrp-Gi1-1" (default)
This output shows that the state of the current router is Standby. The Active router is 192.168.100.2. Further, it shows that the Virtual IP Address is 192.168.100.100 & MAC 0000.0c07.ac01.
R2#show standby
GigabitEthernet1 - Group 1
State is Active
2 state changes, last state change 00:19:54
Virtual IP address is 192.168.100.100
Active virtual MAC address is 0000.0c07.ac01 (MAC In Use)
Local virtual MAC address is 0000.0c07.ac01 (v1 default)
Hello time 3 sec, hold time 10 sec
Next hello sent in 1.104 secs
Preemption disabled
Active router is local
Standby router is 192.168.100.1, priority 100 (expires in 10.096 sec)
Priority 100 (default 100)
Group name is "hsrp-Gi1-1" (default)
This output shows that the current state of R2 is Active. It further shows more details, i.e., Virtual IP and MAC Address, Hello & Hold Down timer, etc.
You can change the priority of the HSRP router to make an active role of the desired device. The default priority is 100. Priority is the numeric value from 0 – 255. The router with a higher priority will become an Active router. To configure the HSRP priority, go to the interface configuration mode and execute the below command:
R1(config)#interface gigabitEthernet 1
R1(config-if)#standby priority 200
However, the priority value has an effect either if the device goes unresponsive or preemption is enabled.
Preemption
HSRP preemption helps us to keep the active device active after a failure recovery. If preemption is enabled, the device with a higher priority becomes an Active device immediately. To configure the preemption, you can hit the below commands:
R1(config)#interface gigabitEthernet 1
R1(config-if)#standby 1 preempt
The preemption takes effect immediately. However, it is recommended to set some delay. So, in the case of a reboot, the router will learn the dynamic routes from its neighbors. To set a delay in HSRP preemption, you can use the below command:
R1(config)#interface gigabitEthernet 1
R1(config-if)#standby 1 preempt delay minimum 60
You will notice that the R1 takes over R2 and becomes an active router.
R1#show standby brief
                     P indicates configured to preempt.
                     |
Interface   Grp  Pri P State   Active          Standby         Virtual IP
Gi1         1    100 P Standby 192.168.100.2   local           192.168.100.100
HSRP Timers
It is a good idea to configure the HSRP timers manually. By default, it takes 10 seconds to perform a failover, and we will have a downtime for 10 seconds.
HSRP allows you to configure the timings in milliseconds to minimize the downtime. To configure the HSRP timers, you can hit the below commands in configuration mode:
R1(config-if)#standby 1 timers ?
  <1-254>  Hello interval in seconds
  msec     Specify hello interval in milliseconds
R1(config-if)#standby 1 timers msec 200 msec 600
This will set the Hello time to 200 milliseconds and Hold down time to 600. The Hold time should be a minimum of three times of Hello time.
HSRP Authentication
Setting up HSRP authentication helps us in packet authenticity between the HSRP routers. In this way, no one from the 192.168.100.0/24 joins the same HSRP group. Cisco router supports MD5 and plain text authentication. To configure the authentication, type the below commands:
R1(config-if)#standby 1 authentication ?
WORD Plain text authentication string
md5 Use MD5 authentication
text Plain text authentication
R1(config)#interface gigabitEthernet 1
R1(config-if)#standby 1 authentication md5 key-string MY_PASSWORD
You should configure the same authentication on the peer device.
HSRP Version 1 and Version 2
Initially, we have only HSRP version 1. However, now you can run HSRP version 2 as well. Both of the versions have almost similar functionality. However, a few things are different. Let’s have a look at the below table to get the differences:
[wptb id=806]
You can configure HSRPv2 by hitting the below commands on both R1 and R2:
R1(config)#interface gigabitEthernet 1
R1(config-if)#standby version 2
R2(config)#interface gigabitEthernet 1
R2(config-if)#standby version 2
Well, now let’s quickly verify the HSRP version:
R1#show standby | include version
GigabitEthernet1 - Group 1 (version 2)
Further Reading
- VRRP – Virtual Router Redundancy Protocol
- HSRP vs VRRP | First-hop redundancy protocols
- Cisco ASA Configuration Backup using SCP, TFTP & ASDM
- How to install Cisco ASAv Firewall in EVE-NG Simulator
- Configure Cisco ASA Firewalls for ASDM Access
- Cisco ASA: Security Levels and Zones Explained
Conclusion
HSRP (Hot Standby Routing Protocol) is a FHRP protocol that provides redundancy and High Availability in computer networks. First, we discussed the HSRP and single point of failure and then configured HSRP on the Cisco IOS devices. Further, we discussed HSRP timers, states, authentication, and preemption.
Did you find this article helpful? Please share it on social media platforms and show us some love 🙂