In this article, we will discuss the Backup and Restore process of the Cisco ASA Firewall configuration. Cisco ASA allows you to take the backup using SCP and TFTP.
If you are using ASDM, you can also export the configuration backup using ASDM.
Cisco ASA has two types of configuration, i.e., Startup Configuration and Running Configuration. As the name suggested, the startup configuration is the configuration that is available during the Firewall startup, and the running configuration is the real-time configuration. You can use the write mem command to copy the running configuration in the startup configuration.

Well, now let’s discuss the complete configuration backup process of the Cisco ASA Firewall.
Exporting Cisco ASA Configuration using SCP
First, we will use the SCP to export the Cisco ASA configuration. For this, you must enable SSH access on the Cisco ASA Firewall. Log in to the Cisco ASA CLI and execute the below command to enable SSH access.
ciscoasa> en
Password: ********
ciscoasa# conf t
ciscoasa(config)# username firewallbuddy password firewallbuddy privilege 15
ciscoasa(config)# ssh 0 0 inside
ciscoasa(config)# end
ciscoasa#
The above configuration will enable SSH on the inside interfaces. Now, execute the below command from Linux Terminal or Windows CMD:
C:\Users\admin>scp firewallbuddy@192.168.31.161:system://running-config .
firewallbuddy@192.168.31.161's password:
running-config                                                                        100%   12KB   3.2MB/s   00:00
Connection to 192.168.31.161 closed by remote host.

C:\Users\admin>
If you want to change the directory and name of running-config, replace “.” with the directory and file name. For Example:
C:\Users\admin>scp firewallbuddy@192.168.31.161:system://running-config C:\Users\admin\Desktop\running-config-25122023.txt
firewallbuddy@192.168.31.161's password:
running-config                                                                        100%   12KB   3.2MB/s   00:00
Connection to 192.168.31.161 closed by remote host.

C:\Users\admin>
Also, if want to export the configuration manually from the ASA enable mode, use the below steps to export the firewall configuration:
ciscoasa> en
Password: ********
ciscoasa# copy running-config scp:
Source filename [running-config]?
Address or name of remote host []? 192.168.31.174
Destination username []? firewallbuddy
Destination filename [running-config]?
Cryptochecksum: 7a97e2ff 76c7b558 7db0fbbe 4dda8bbf
Password: ********
!!!!!!!!!!!!
11930 bytes copied in 4.310 secs (2982 bytes/sec)
ciscoasa#
Exporting Cisco ASA Configuration using TFTP
Well, now we will export the running configuration using the TFTP. You need to log in to the Cisco ASA and run the below commands to export the running configuration.
ciscoasa> en
Password: ********
ciscoasa# copy running-config tftp:
Source filename [running-config]?
Address or name of remote host []? 192.168.31.225
Destination filename [running-config]?
Cryptochecksum: 0eca1f30 ce73109a 33ece8f1 5b0e3947
11930 bytes copied in 0.100 secs
ciscoasa#
Exporting Cisco ASA Configuration using ASDM
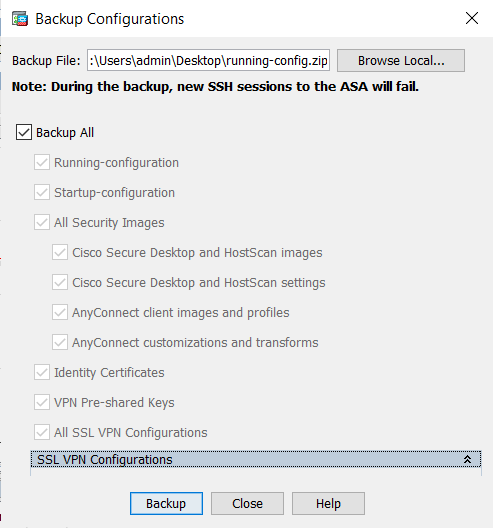
Finally, we will export the running configuration of the Cisco ASA firewall using ASDM. It also exports the Certificates and WebVPN configuration as well.
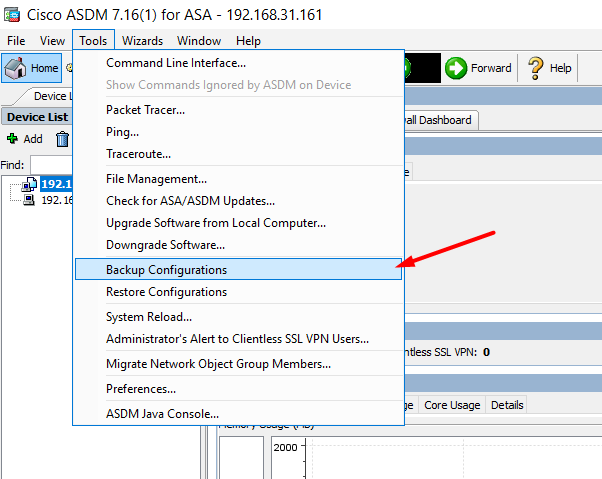
Login to the Cisco ASA ASDM and Navigate to Tools >Backup Configurations.
Select the configuration that you want to back up. In this example, I’m exporting the full configuration backup.
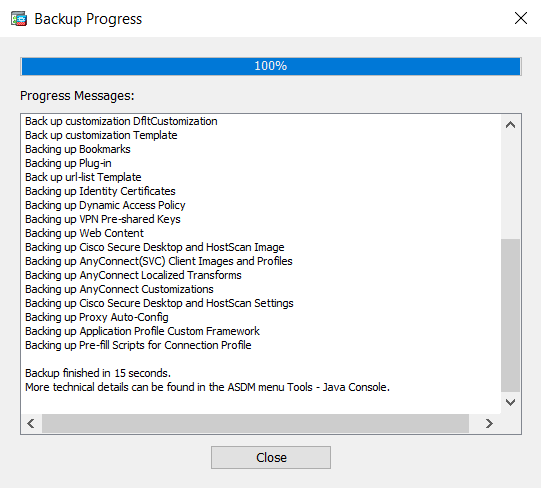
Once this process is completed, you will get the below message.
Now, you can navigate to the same file and use this to restore the configuration.
Related Articles
- Cisco ASA Firewall – Hairpin or U-turn NAT
- Cisco ASA Firewall Interview Questions and Answers – 2023
- How to install Cisco ASAv Firewall in EVE-NG Simulator
- Enable Telnet and SSH access to the Cisco ASA Firewall
- Configure Cisco ASA Firewall for ASDM Access
- Cisco ASA: Security Levels and Zones Explained
- How to configure Static Routes on Cisco ASA Firewall
Conclusion
In this article, we have taken the backup of the Cisco ASA firewall using SCP, TFTP, and ASDM. We have discussed the multiple ways to take the backup of Cisco ASA using SCP. This will surely help you to save time during the backup process. Also, you can restore the restored backup in one click. Comment in the comment box for any issues.
Please share this article on social media platforms and show us some love.