In the last article, we used strongSwan and configured an IPSec tunnel between two Ubuntu servers. In this article, we will configure the IPSec tunnel between Palo Alto Networks Firewalls and Ubuntu. Let’s get started!
Prerequisite
To configure an IPSec tunnel, you must have privileges to modify the Palo Alto Networks firewall configuration. Similarly, you should have a root or a non-root user account to perform the required changes on the Linux server.
Before configuring the iPSec tunnel, understand the lab setup. It will help you to understand the required configuration immediately.
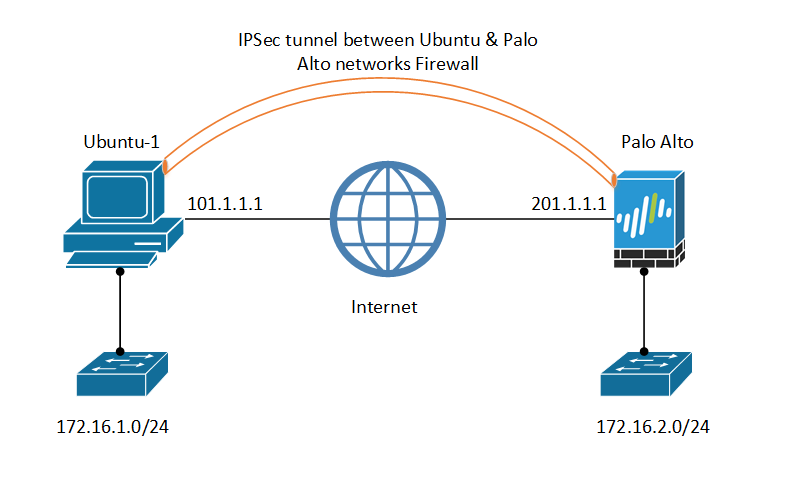
We have public IP Addresses assigned on both gateways, i.e., Palo Alto and Ubuntu. We have additional interfaces with private subnets, i.e., 172.16.1.0/24 and 172.16.2.0/24.
First, we will set up the IPsec tunnel on Ubuntu and then on Palo Alto Networks Firewall.
Enabling the IP forwarding on the Linux kernel
By default, the Linux kernel doesn’t perform any routing. You must configure the Linux kernel to enable the routing. Open the /etc/sysctl.conf file using vi or nano, set the below parameters and save the file.
net.ipv4.ip_forward = 1
net.ipv4.conf.all.accept_redirects = 0
net.ipv4.conf.all.send_redirects = 0
Now, load these kernel parameters using the below command:
sudo sysctl --load
You will get the below output while loading these parameters in runtime:
user@ubuntu1:~$ sudo sysctl --load
net.ipv4.ip_forward = 1
net.ipv6.conf.all.forwarding = 1
net.ipv4.conf.all.accept_redirects = 0
net.ipv4.conf.all.send_redirects = 0
Additionally, if the UFW is enabled, you must configure the below rules to allow the traffic. Add the following line to the Ubuntu-1:
*nat
:POSTROUTING ACCEPT [0:0]
-A POSTROUTING -s 172.16.2.0/24 -d 172.16.1.0/24 -j MASQUERADE
COMMIT
Installing strongSwan on Linux
We will start the strongSwan installation by updating the index of locally installed packages. Execute the below commands on both machines:
user@ubuntu1:~$ sudo sudo apt update
Once it completes, run the below command to install the strongSwan on both machines:
sudo apt install strongswan
By default, after the installation, the strongswan should be up and running. You can verify the service status using the below command:
sudo systemctl status ipsec.service
Configuring IPSec tunnel on Ubuntu
To configure an IPSec tunnel, we must define the IPSec configuration in /etc/ipsec.conf file. First, let’s take the backup of the original file using the below command:
sudo cp /etc/ipsec.conf{,.orig}
Now, copy the IPSec tunnel configuration into the /etc/ipsec.conf. You can use the below sample configuration file and change the settings according to your requirements.
conn ubuntu-to-paloalto
type=tunnel
auto=start
keyexchange=ikev2
authby=secret
left=101.1.1.1
leftsubnet=172.16.1.0/24
right=201.1.1.1
rightsubnet=172.16.2.0/24
ike=aes256-sha1-modp1024!
esp=aes256-sha1!
keyingtries=%forever
ikelifetime=28800s
lifetime=3600s
This is the basic IPSec configuration with the IKEv1 protocol. Below is the information on the parameters we used:
- conn: Connection Name for the IPSec Tunnel
- type: IPSec Tunnel Type, Tunnel / Transport
- auto: IPsec startup operations
- keyexchange: IKE protocol version
- authby: Authentication Method
- left: Public IP Address of the local gateway
- leftsubnet: Private IP Address of the local gateway
- right: Public IP Address of the remote gateway
- rightsubnet: Private IP Address of the remote gateway
- ike: Cipher Suites for IKE phase 1
- esp: Cipher Suites for IKE phase 2
- ikelifetime: Phase 1 lifetime
- lifetime: Phase 2 lifetime
Configure the peer authentication for the IPSec on Linux
Now, we will define the authentication for the Palo Alto Networks gateway. First, generate a Pre-Shared Key using the below command:
openssl rand -base64 14
This will generate a strong pre-shared key.
user@FirewalBuddy:/etc/netplan$ openssl rand -base64 14
Q2ULlXF30mwMiOyVS5g=
The IPSec authentication configuration should be defined into the /etc/ipsec.secrt file. First, let’s take the original file backup using the below command:
sudo cp /etc/ipsec.secrets{,.orig}
Now, open the /etc/ipsec.secrets file and paste the below configuration:
101.1.1.1 201.1.1.1 : PSK "Q2ULlXF30mwMiOyVS5g="
Finally, restart the IPsec on Ubuntu using the below command:
sudo ipsec restart
To check the ipsec status, run the below command:
sudo ipsec status
Further, we will configure the IPSec tunnel on the Palo Alto Networks side.
Configuring IPSec tunnel on Palo Alto Networks Firewalls
To configure an IPSec tunnel on Palo Alto Network firewalls, you should first create a security zone and tunnel interface, define IPSec Phase1 and Phase2 profiles, IKE profiles, and IPSec tunnel, and finally perform the routing to access the remote subnet.
Let’s quickly perform all of these tasks on Palo Alto Networks Firewalls.
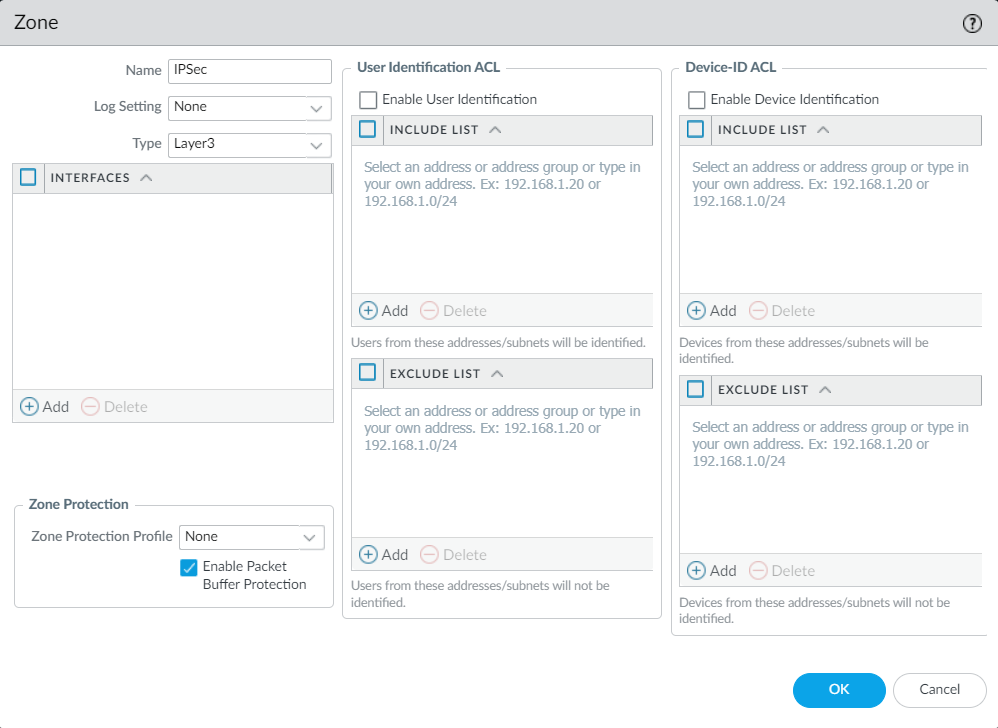
To create a security zone on the Palo Alto Firewall, Navigate to Network > Zones and click on Add. Define a layer 3 zone.
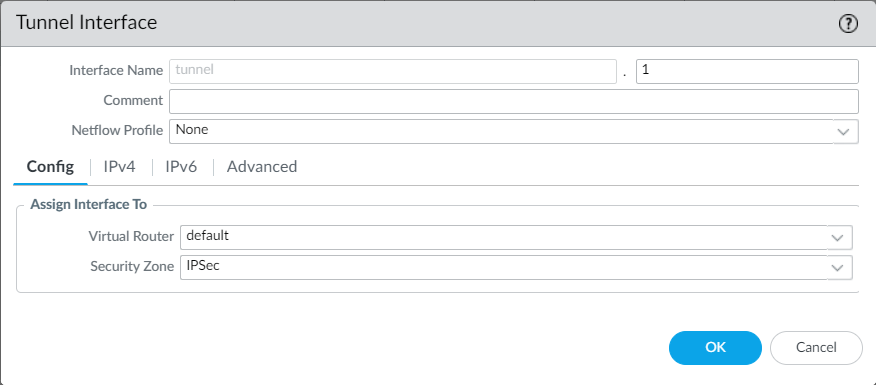
Now, navigate to Network > Interfaces > Tunnel and click on Add. Choose the security zone that we created and the virtual router. Once done, click on OK.
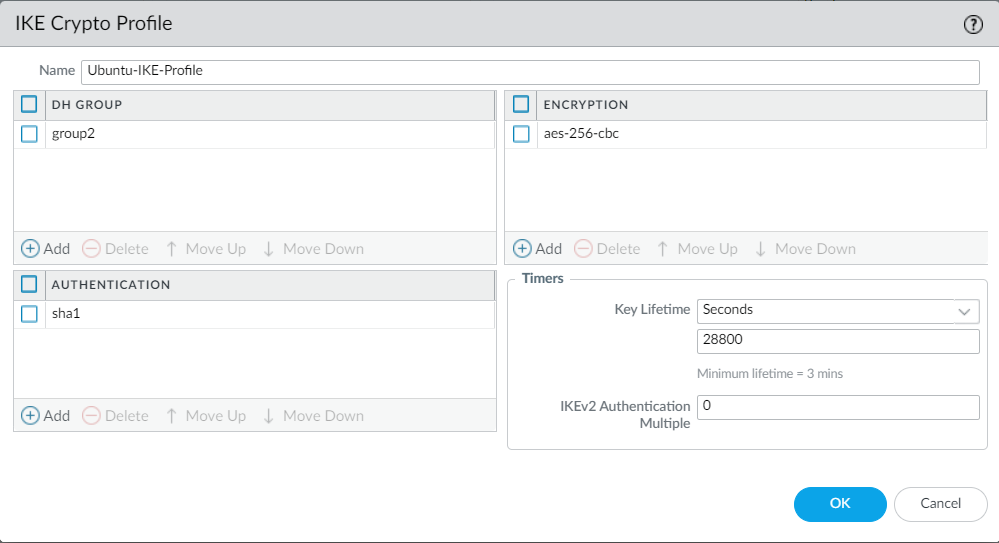
Navigate to Network > Network Profiles > IKE Crypto, and define the IKE Phase 1 profile with the similar cipher suites used on Ubuntu.
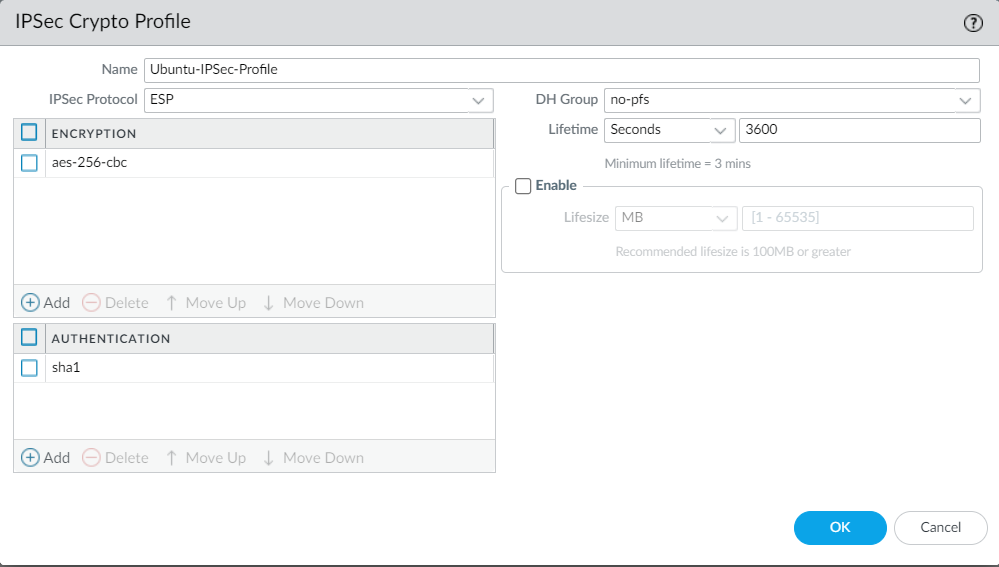
Navigate to Network > Network Profiles > IPSec Crypto, and define the IKE Phase 2 profile with the similar cipher suites used on Ubuntu.
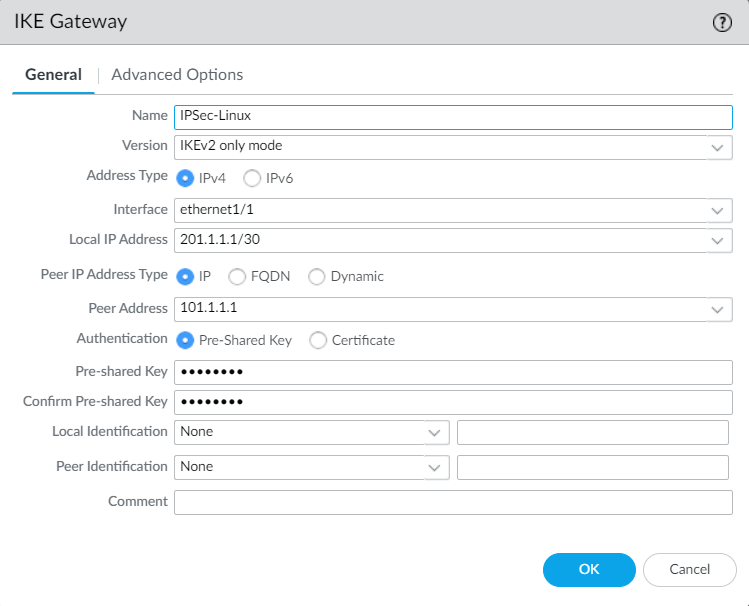
Define the IKE gateway by navigating to Network > Network Profiles > IKE Gateways. Click on Add and define the peer gateway information, i.e., Linux.
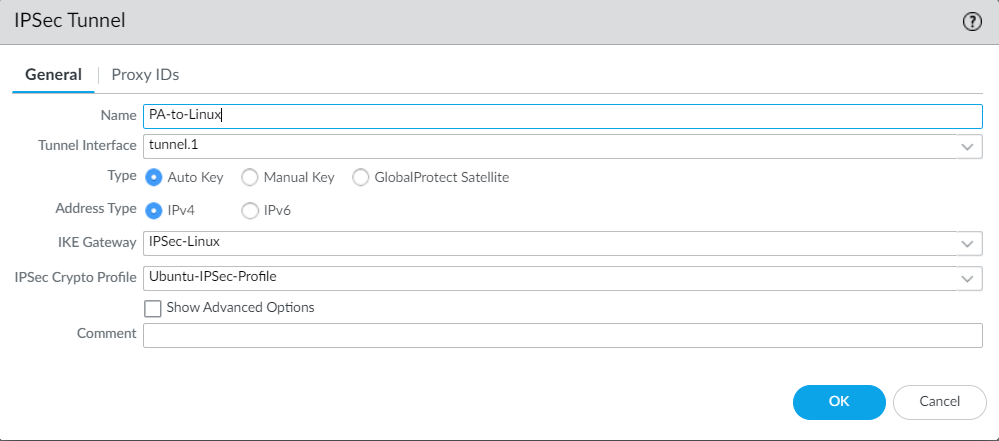
Now, create the IPSec tunnel and define the Proxy IDs on Palo Alto Networks Firewall. Navigate to Network > IPSec Tunnels.
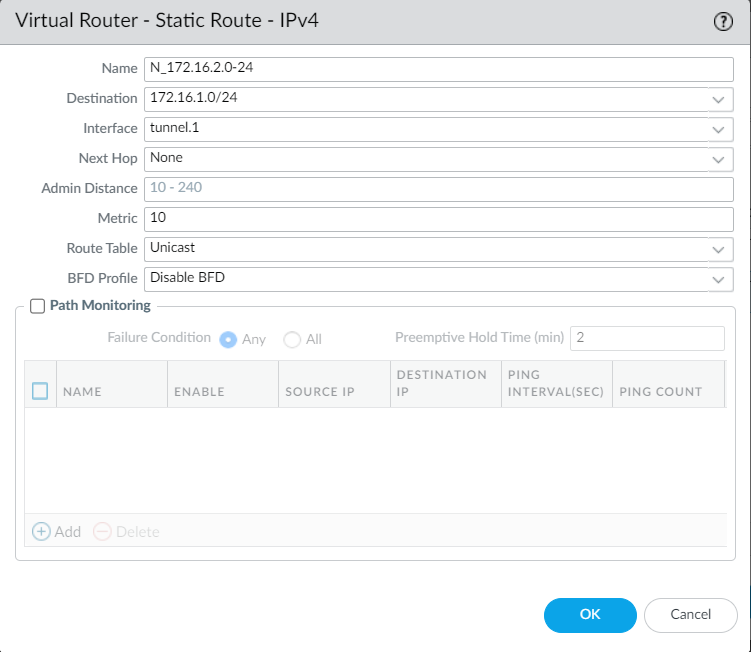
Finally, create a route for the remote subnet and commit the changes. Navigate to Network > Virtual Router > Edit your virtual router, and configure the virtual router.
Verifying the IPSec tunnel between Palo Alto Networks Firewall and Ubuntu
It’s time to verify the IPSec tunnel configuration. Open the Palo Alto Networks firewall CLI and initiate the IPSec tunnel.
To initiate IKE Phase1 execute the below command:
test vpn ike-sa gateway IPSec-Linux
Similarly, to initiate IKE Phase2 execute the below command:
test vpn ipsec-sa tunnel PA-to-Linux:ID1
Both commands will initiate IPSec Phase 1 and Phase 2. Now, the IPSec tunnel should be up. To verify the IPSec tunnel status on Linux, hit the ipsec status command:
user@FirewalBuddy:~$ sudo ipsec status
Security Associations (1 up, 0 connecting):
ubuntu-to-paloalto[1]: ESTABLISHED 32 minutes ago, 101.1.1.1[101.1.1.1]...201.1.1.1[201.1.1.1]
ubuntu-to-paloalto{1}: INSTALLED, TUNNEL, reqid 1, ESP SPIs: cf8b8332_i a3557a87_o
ubuntu-to-paloalto{1}: 172.16.1.0/24 === 172.16.2.0/24
On the Palo Alto Networks firewall, navigate to Network > IPSec Tunnels, and the IPSec tunnel with Ubuntu should be up.

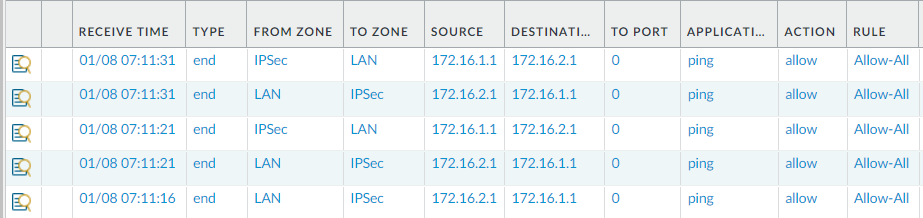
Further, we can see the traffic logs between these gateways:
Further Reading
- How to configure IPSec tunnel on Ubuntu using strongSwan
- Automated backup from Palo Alto Networks Firewall without Panorama
- How to configure High Availability on Palo Alto Networks Firewalls
- How to add Palo Alto Networks Firewall into Panorama
- Install Apache Web Server on Ubuntu 22.04
Conclusion
Configuring the IPSec tunnel between Palo Alto and Ubuntu helps us by routing the traffic from one site to another. The strongSwan utility helps to configure and manage the IPSec VPN on different devices.
First, we configured IPSec on Ubuntu and later configured it on the Palo Alto Networks firewall.
Did you find this article helpful? Please share this on social media platforms and show us some love 🙂