Bitnami is a library of software packages that help build Web Applications efficiently. Generally, users deploy Bitnami to host WordPress. Bitnami uses the Apache server to host Web Applications. However, the Virtual Hosts configuration is different on Bitnami than on a traditional Apache Server.
In this tutorial, we have an existing application, i.e., firewallbuddy.com, and we will set up an additional web application, for example, app.firewallbuddy.com. We can set up an additional server for app.firewallbuddy.com. However, we will use the resources of the same Bitnami server to avoid additional costs and administrations. Let’s get started!

The default approach to add Virtual Hosts in Apache
Usually, we use configure DNS mapping the additional applications. Further, we need to set up the Virtual Hosts configurations. The default Virtual Hosts configuration is available /etc/apache2/sites-available/.
To add a web application, such as app.firewallinfo.com, we need to navigate to /etc/apache2/sites-available/ and create a new file as below:
cd /etc/apache2/sites-available/
touch app.firewallbuddy.com.conf
Now, use your text editor and set the below information into the app.firewallbuddy.com.conf file.
nano app.firewallbuddy.com.conf
<VirtualHost *:80>
     DocumentRoot /var/www/app.firewallbuddy.com
     ServerName app.firewallbuddy.com
</VirtualHost>
Save this Virtual Hosts file, and to enable our application, we will use the a2ensite and restart the Apache web server.
a2ensite app.firewallbuddy.com.conf
service apache2 restart
The Bitnami approach to define custom web applications
The approach is different to define Virtual Hosts in a Bitnami web server. Bitnami manages the Virtual Hosts configuration files under the /opt/bitnami/apache/conf/vhosts/ directory. Similarly, all bitnami applications are available under /opt/bitnami/ directory.
First, we need to create an application directory under the /opt/bitnami/. You can directly use the below command to create it:
sudo mkdir -p /opt/bitnami/app.firewallbuddy.com
Now, let’s create an HTML file, i.e., index.html under the /opt/bitnami/app.firewallbuddy.com/ directory and define a web page.
sudo nano /opt/bitnami/app.firewallbuddy.com/index.html
<html>
<head>
<title>Welcome to Bitnami Application </title>
</head>
<body>
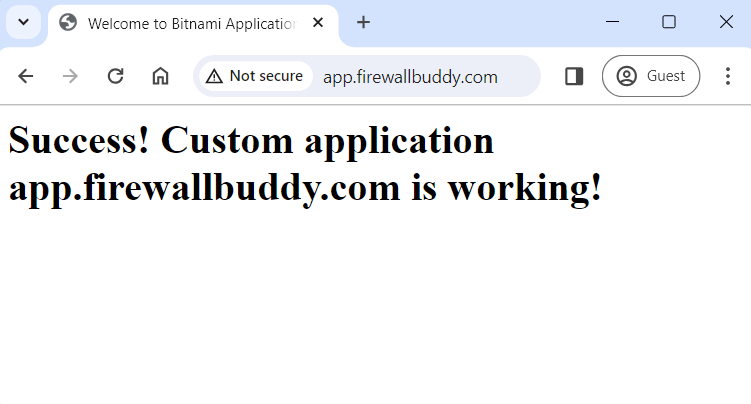
<h1>Success! Custom application app.firewallbuddy.com is working!</h1>
</body>
</html>
Save the file, and change the permission of the newly created application:
sudo chown bitnami:daemon -R /opt/bitnami/app.firewallbuddy.com/
That’s it! We have completed the definition of our custom application.
Define the Virtual Hosts on the Bitnami Server
Here, we will add the Virtual Hosts for the custom application. We will use the below command to create a custom Virtual Hosts file for the app.firewallnetwork.com:
sudo touch /opt/bitnami/apache/conf/vhosts/app.firewallbuddy.com.vhost.conf
Now, add the Virtual Hosts configuration into /opt/bitnami/apache/conf/vhosts/app.firewallbuddy.com.vhost.conf.
Ensure that the virtual host file name is ending with *vhost.conf!
sudo nano /opt/bitnami/apache/conf/vhosts/app.firewallbuddy.com.vhost.conf
<VirtualHost *:80>
    DocumentRoot /opt/bitnami/app.firewallbuddy.com
    ServerName app.firewallbuddy.com
    <Directory "/opt/bitnami/app.firewallbuddy.com">
      Options -Indexes +FollowSymLinks -MultiViews
      AllowOverride All
      Require all granted
    </Directory>
</VirtualHost>
You can also define one more Virtual Hosts file to access the custom application using HTTPS. If you own the custom application domain, you may request a free SSL certificate from Let’s Encrypt.
<VirtualHost *:443>
    ServerAlias *
    DocumentRoot /opt/bitnami/app.firewallbuddy.com
    ServerName app.firewallbuddy.com
    SSLEngine on
    SSLCertificateFile "/opt/bitnami/apache/conf/app.firewallbuddy.com.crt"
    SSLCertificateKeyFile "/opt/bitnami/apache/conf/app.firewallbuddy.com.key"
    <Directory "/opt/bitnami/app.firewallbuddy.com">
      Options -Indexes +FollowSymLinks -MultiViews
      AllowOverride All
      Require all granted
    </Directory>
</VirtualHost>
Let’s create a DNS mapping to access your custom application using fqdn. You can configure A record (Address record ) on your domain provider portal. If you can’t access the domain provider portal, add a host entry to your system.
For Linux systems, use the below command to add a localhost entry:
sudo echo "35.179.85.11 app.firewallbuddy.com" >> /etc/hosts
For the Windows system, you need to edit the C:\Windows\System32\drivers\etc\hosts file using a text editor with administrative privileges.
Restarting the Apache on Bitnami Server
Finally, we need to restart the Apache on the Bitnmai server to make our custom application effective. However, restarting of Apache server is different on Bitnami. You can use the below command to restart the Apache Server:
sudo /opt/bitnami/ctlscript.sh restart apache
We have completed the process of defining the custom application on bitnami. You can access it on your web browser using http://app.firewallbuddy.com.
Further Reading
Conclusion
In this article, we have successfully deployed a custom web application on Bitnami Server. You can set up a new custom application by defining the application directory under /opt/bitnmai/ and virtual host configuration under /opt/bitnami/apache/conf/vhosts/.
I hope this article is easy to understand. If this article is helpful, please share it on social media platforms.